
Knotting and Buckling in the Front

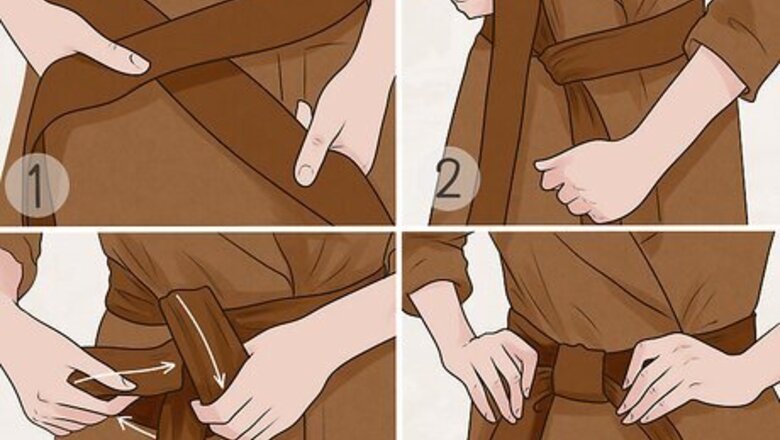
Tie a double overhand knot as a quick on-the-go closure. Bring both ends of the belt to the front, with the tail end (the one without the buckle) longer. Crisscross the two ends with the tail going over the buckle end. Wrap the tail end underneath to tie a single overhand knot. The tail end should now be pointing upwards. Guide it back under the buckle end horizontally to create a loop. Draw the tail end through this loop to complete the second overhand knot. This is a classic, stylish, and flattering knot! Tug both ends to point them downward and secure the knot. This casual style is perfect for on-the-go tying and untying.

Create an angled 2-loop bow to add a touch of femininity to your trench. Bring both ends of the belt to the front and arrange them to be the same length. Tie a single overhand knot with the tail end wrapping over the buckle end. Tighten this knot to cinch your waist. The tail end should be pointing upwards at this stage. Fold it over to create 1 “bunny ear” loop. Pinch this bow loop in place against the overhand knot and angle it outward from your body. Bring the buckle end upwards and crisscross it over the top of this bow loop to create an open space in front of the overhand knot. Push the buckle end upwards through this open space while folding it to create a second “bunny ear.” Position this second bow loop upwards, with the buckle frame hanging downward. Arrange and tug both loops and ends until the bow is tight. Think of this process like you’re tying your shoelaces. The only difference is that you’re carefully arranging the belt ends so they hang nicely. Most trench coat belts aren’t long enough to make a perfect, symmetrical upright bow. This style takes advantage of the inevitable asymmetry, keeping the bow loops to one side and the ends to the other.

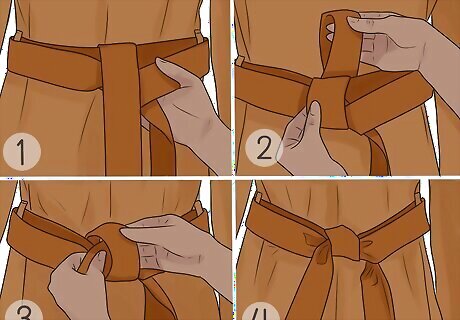
Tie a 1-loop bow as a chic alternative to traditional knots and bows. Bring both belt ends to the front, keeping the buckle end longer. Tie a single overhand knot to cinch your waist. Fold the buckle end to create a single upright “bunny ear” loop. Bring the shorter tail end over this bow loop to create an open space. Then, slide the tail end all the way through this open space. Hold the bow loop in place and pull the tail end to tighten the knot. This process is like tying your shoelaces, except that only 1 bow loop will be remaining instead of 2. Once you get the hang of this knot, it can be a quick and more polished substitute for the double overhand knot. Try sliding the knot towards one side of your body and arrange the bow loop and ends on an angle for a more stylish closure.

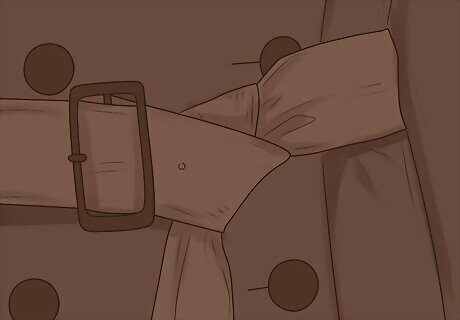
Buckle the belt for traditional trench styling. Draw both ends of the belt to the front. Position the buckle frame at the point where the coat overlaps, and leave the tail end long. Thread the tail up through the buckle frame, towards the front. Guide it back down under the other side of the frame. Pull it so that the tail lies flat within the buckle. Then thread the tail end through the remaining belt loops. You can thread the tail through just one belt loop and leave it hanging, or you can wrap it all around if you don’t want a tail hanging down. If there are belt prong and holes, push the prong through the most comfortable belt hole before guiding the tail back under the buckle frame. This can be a classic look, but it does take some time to get in and out of.
Arrange the buckled belt in a downward knot for an updated look. First, buckle the belt. After you thread the tail end through the belt buckle frame, bring it upwards, passing under the cinched belt. If the tail end came out on the right side of the buckle, pass it under the right side of the belt, and vice versa for the left. Hold the resulting loop on the bottom open. Bring the tail end towards the front and thread it down through this open loop. Pull the tail to tighten the knot. With this style, you’ll be left with a long tail and a clean, crisp line. Note that this style will take some time to undo. If you plan to take your trench coat on and off this may not be the most convenient approach.
Tying Knots at the Back
Create a classic wrap-around knot at the back of your unbuttoned coat. Bring both sides of the belt to the back, keeping the tail end longer. Crisscross the ends with buckle side underneath the tail end. Tie a single overhand knot, bringing the tail end upwards as you cinch the belt. Drop the tail end to let it hang downwards. Then, guide the tail behind the buckle end, passing it closer to your body, and point it out to the side. It should be perpendicular to the buckle end and parallel to the ground. Fold the tail end over so that the tip points in the opposite direction, while still holding it parallel to the ground. Thread the tip through the outermost gap that it has created, and pull it tight. This produces a clean-looking knot. Both ends hang neatly outward. Tying the belt in the back with a nice ribbon can also create more shape. When you create the first overhand knot, you can loop the tail end underneath the horizontal part of the belt that’s positioned between the belt loops. This will keep the knot situated closer to the body.

Tie a half-Windsor knot at the back for an elegant belt arrangement. This is just like[[Tie a Windsor Knot|tying a necktie]! Bring both belt ends to the back, keeping the buckle side longer. Crisscross the buckle side over the tail end. Then, wrap the buckle side behind the tail and bring it out to the side, positioning it perpendicular to the tail end and parallel to the ground. Draw it across to the other side, folding it horizontally over the front of the knot. Finally, guide the buckle side upwards behind the knot and thread it down through the outermost gap. Tug both ends to tighten the traditional half-Windsor knot. They will be pointing directly downwards like the ends of a necktie.

Secure a simplified half-Windsor knot at the back for a quicker closure. With the buckle end longer, bring both ends of the belt to the back. Overlap the buckle end over the tail in a crisscross manner. Guide the buckle side behind the tail and draw it out to the side horizontally. Instead of folding the belt end over the knot, just draw it up behind the knot area. The belt end should cross underneath itself. Bring it towards the front and thread it through the outermost loop. Pull down and tug on both ends to secure the knot. This is a simpler method that produces a similar look, but with less effort. Instead of going around the knot twice, as with the traditional half-Windsor, you’ll just go around once.


Comments
0 comment