
Assembling the Wall Frame
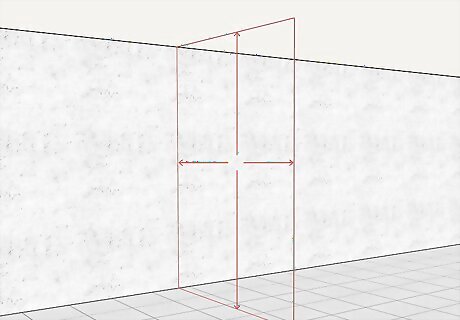
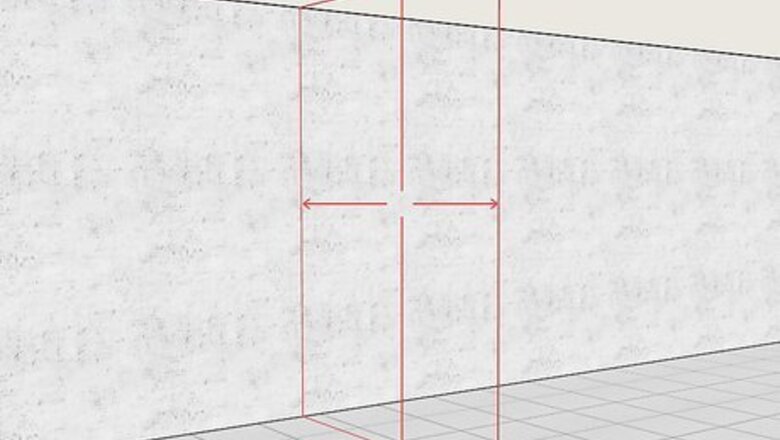
Measure the height of the space where you want your wall to go. Start by deciding how long your wall will be and write this dimension down on a sheet of paper. Then, stretch a tape measure from floor to ceiling at both ends of your chosen location. Jot down these measurements alongside the first. You’re free to make your wall as long as you like. Keep in mind, however, that the completed wall will cut down on the amount of floor space you have available. Larger walls will also require more labor to take apart than smaller ones. Taking two separate height measurements rather than just one will provide for small variations in the floor and ceiling of the room you’re installing the wall in.

Apply sill sealer to the floor and ceiling where they’ll connect with the wall. Cut two strips of ⁄4 inch (0.64 cm) foam sill sealer to match the length you’ve selected for your wall. Lay the bottom strip along the floor where the wall will run. You can either use tape or a mild adhesive to secure the top strip or simply hold off on positioning it until it’s time to put everything together. You’ll find sill sealer, also known as sill gasket, at any major hardware store or home improvement center. Sill sealer is sold in large rolls that range in width from 5 ⁄2 inches (11 cm) to 7 ⁄2 inches (17 cm). A 5 ⁄2 in (11 cm) roll will be the perfect size for this project.
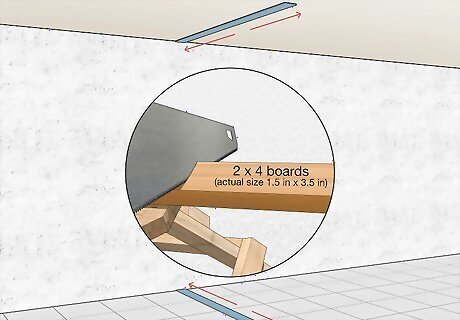
Cut a pair of 2x4 boards to match the intended length of your wall. Use your tape measure and a pencil to mark the precise length dimensions on the boards. Then, trim the boards to size with a circular saw or hand saw. These pieces will serve as the top and bottom plates for your wall. Cutting tools can be extremely dangerous when operated incorrectly, so be careful and pay close attention to what you’re doing at all times.

Saw two more 2x4s to the height of your space minus 3 inches (7.6 cm). Now, subtract 3 inches (7.6 cm) from both of the height measurements you took earlier and transcribe the resulting dimensions onto a fresh pair of boards. Cut these boards using the same method you did for the first set. They’ll function as the vertical studs on either end of the finished frame. Reducing the length of your stud boards by 3 inches (7.6 cm) will account for the thickness of the top and bottom plates—2x4s have an actual thickness of 1 ⁄2 inch (1.3 cm).
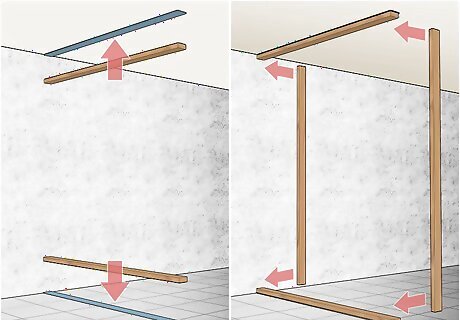
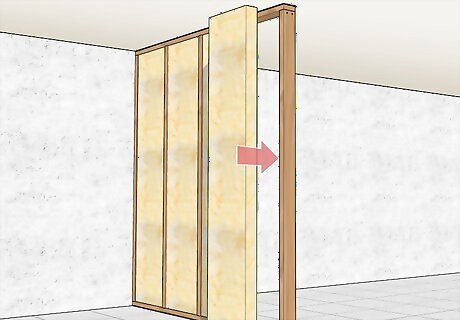
Piece together your individual framing components. First, position your top and bottom plates over your sill sealer strips, which should be situated in the location you’ve decided on for your wall. Then, stand up your end studs and wedge them between the plates perpendicularly, making sure the broad faces are flush with the ends of the plates. You may need to recruit a helper to hold the top sill sealer and plate in place while you negotiate the studs or vice-versa. If you’re having a hard time getting your ends studs to fit in between the plates, try tapping them in with a rubber mallet.Tip: If you discover that your studs are slightly too long to fit the frame, trim them down with your saw or an orbital sander. If they’re too short, slide one or more wooden shims between the upper edge of the board and the top plate above.

Toe-nail the studs to the plates with 16D framing nails to fasten your frame. Hold a nail against one side of the lower part of the first end stud. Use a hammer to drive the nail in carefully at a 40-45-degree angle so that the tip seats securely in the bottom plate. Do the same where the upper part of the stud meets the top plate, then repeat the process on the opposite stud. Wood screws are also an option. One advantage of screws is that they’ll be easier to remove later on once the time comes to dismantle your wall. It may also be a good idea to nail the top plate to the nearest ceiling joist if you plan on putting a door in your wall or have children or pets who might pose a risk to its stability. A couple extra nails should be enough to keep the whole structure from moving.

Add a few intervening studs if your frame runs more than 4–5 feet (1.2–1.5 m). Longer walls will benefit from some additional internal support. Cut enough studs to space the individual boards 16–24 inches (41–61 cm) apart on center down the length of your frame. Toe-nail these studs to the top and bottom plates just as you did the first pair. Additional studs will prevent your wall from collapsing under the force of knocks, bumps, and other sudden impacts.
Finishing Your Wall
Insulate your wall with fiberglass batts if you want to partially soundproof it. Slip the insulation panels into your frame in the spaces between the studs, being careful not to crush or compress them. Most fiberglass batts are sized in accordance with standard stud spacings for interior walls, so you should have no problem getting a perfect fit. If you notice any excess insulation piling up at the bottom of the frame, carefully slice it off using a sharp utility knife. Anytime you’re working with fiberglass insulation, always wear long-sleeved clothing, gloves, eye protection, and a facemask to safeguard your skin, eyes, airways, and other sensitive areas. It helps to put talcum or baby powder on your forearms and hands before interacting with the insulation. This prevents the fiberglass from accessing your pores. Once you get the powder off, you won't be itchy at all!

Hang drywall on your completed frame to enclose it. Mark a series of drywall sheets with vertical lines corresponding to the spacing of the vertical studs in your frame. Score the sheets with a utility knife, then snap them apart by hand or grab a drywall saw to handle the fine cutting. Fasten each panel to the frame by sinking 1 ⁄8 in (1.6 cm) drywall nails every 4–6 inches (10–15 cm) down its entire length on both sides. Drywall comes in several standard thicknesses, but the ⁄8 inch (0.95 cm) variety is a good all-around size that will suit most interior walls. Most drywall jobs are concluded by applying drywall tape and joint compound in order to strengthen the sections where the individual panels meet. For a temporary wall, however, these final steps will be optional.Tip: When installing drywall, your main goal should be to end up with the fewest number of joints possible. Mounting the sheets horizontally usually makes this easiest.
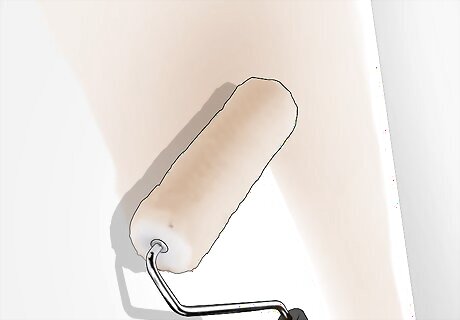
Paint your temporary wall if you want it to match the rest of the room. Apply 2-3 coats each of interior latex primer and paint in your chosen color to make your new addition blend in with the surrounding walls. Aim for even coverage and consistent depth of color, and allow each coat to dry for 30 minutes to an hour before moving onto follow-up coats. If your wall is only a few feet wide, you should be able to paint it easily with a handheld brush. Otherwise, you’ll save yourself some time and labor by using a roller. Hold off on adding trim and other embellishments until after you’ve painted to avoid creating more work for yourself. The only exception is when you want to paint the trim the same color as the wall itself.
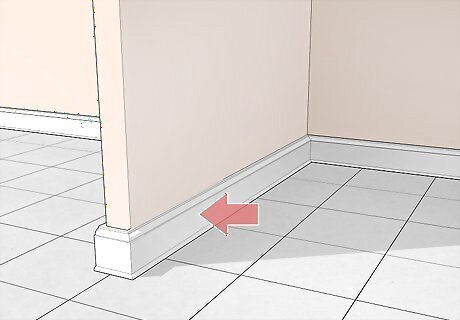
Add a few pieces of decorative trim to give your wall a more authentic look. Use your circular saw to cut your trim boards to the correct length and arrange them on the bottom of the wall. If needed, use a dab of carpenter’s glue to hold the boards in place if needed. When you’re satisfied with their placement, attach them to each point along the wall where there’s an underlying stud using two 8d finishing nails. Track down a type of trim that matches the room’s existing accents, or choose a style that you think will look good in the area your wall will be going in. This is one of the easiest and most inexpensive ways to customize the appearance of a temporary wall. You can repeat this same process if you decide to add matching crown molding to the top of the wall.

Put in a door for easy entry. If you’re using your fake wall to close off an open-air study, office space, or similar area, you might choose to add a door for additional privacy and convenience. To add a door from scratch, you’ll need to cut an appropriately-sized opening in your wall, then fit and hang the door itself, along with the necessary mounting hardware. Depending on how elaborate you want your faux wall to be, you may also opt to cut and install trim to frame the mounted door and create more visual contrast with the surrounding surface. Installing a brand new door, opening and all, can be a fairly involved project. But with the right tools and a good guide, it’s not outside the capabilities of the average homeowner.


Comments
0 comment