
Cutting the Rafter Pieces

Buy 24 2x4 boards for the rafters. If your shed is 10 feet (3.0 m) wide, each full rafter piece will be constructed of 4 2x4 boards that are 4 feet (1.2 m) long. Count the number of wall studs you have. You’ll need a full rafter piece for each wall stud in your barn or shed. If you have 6 wall studs, you’ll need 6 full rafters. Since you need 4 boards per rafter, it means you’ll need a total of 24 boards. You can also get 8 feet (2.4 m)-long boards and cut them in half. It may be helpful to buy extra boards in case you make a mistake.

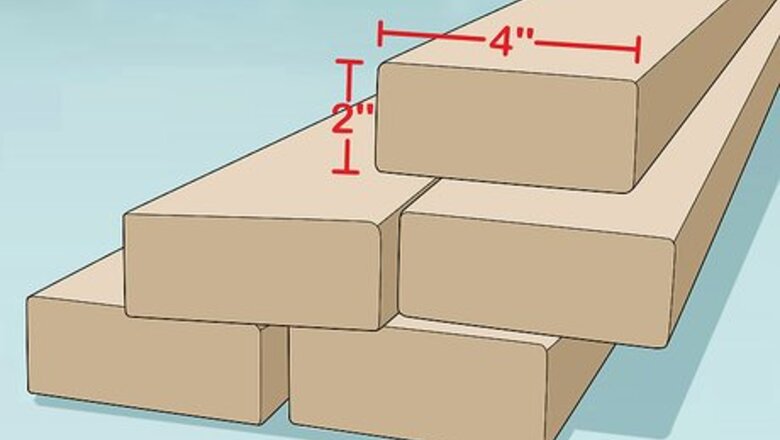
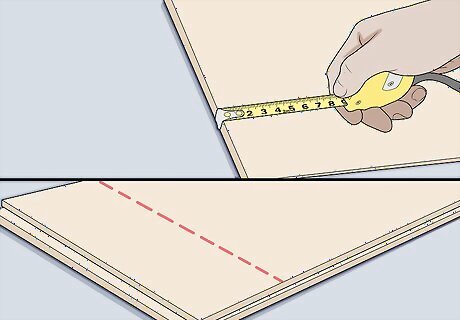
Mark the end of the boards on a 22.5-degree angle. Line the pivot point on a speed square to the corner of each board at a 22.5-degree angle and mark it with a pencil. Both ends of each board should be marked this way. You'll cut along the lines that you make.

Cut the boards with a miter or circular saw. Line the saw blade up against the line that you made. Press the trigger on the saw and lower it to cut off the ends of the boards at an angle. Once you’re done, the board’s ends should sit fit flush against each other. If you have a miter saw, you can set the cutting angle on the saw itself without having to use a speed square.
Assembling the Rafters
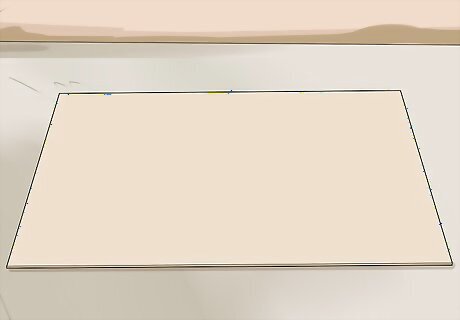
Lay a piece of 10 ft × 5 ft (3.0 m × 1.5 m) plywood on the floor. This piece of plywood represents the dimensions for your roof and will serve as an assembly site for your rafters. If you have a 10 ft (3.0 m)-wide shed, your roof will be 10 ft (3.0 m)-wide and 5 ft (1.5 m)-tall. Lay down the piece of plywood in an area with ample space.
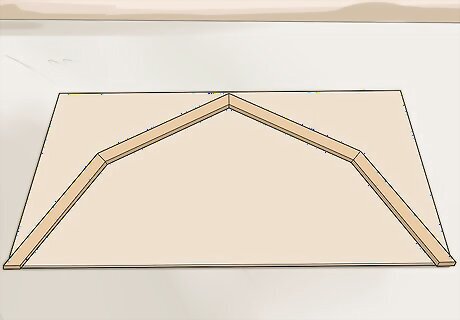
Assemble the rafters onto the piece of plywood. Place the rafter pieces on the piece of plywood and line them up so that the ends of each piece runs flush with the piece next to it. This is how the rafters will look when they are on top of your shed.
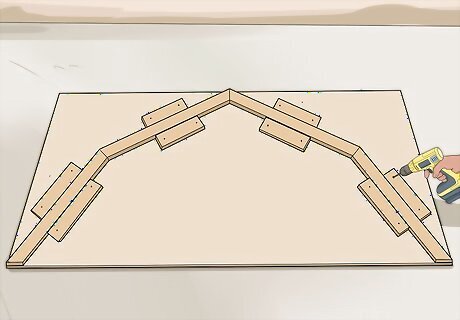
Screw wood blocks on both sides of each side of the boards. Position 3 in × 6 in (76 mm × 152 mm) wood blocks on both sides of each rafter piece. The wood blocks will help keep the rafter pieces in place as you connect them. Use an electric screwdriver to drive screws into each end of the wood blocks and directly into the plywood below. You can use the wood from any excess wood that you cut so far.

Trace and cut OSB or plywood joints to connect the rafter pieces. Place a 6 in × 12 in (15 cm × 30 cm) rectangular piece of OSB or ⁄4 in (1.9 cm)-thick plywood under the joint of an assembled rafter. Trace the top of the joint so the angle is at the same degrees as where the rafters connect. Then, use a saw to cut the lines that you drew. These pieces are known as the gussets.
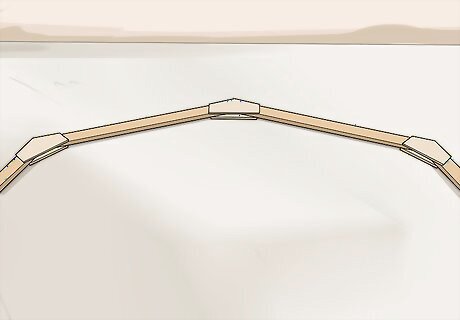
Use the gusset as a template and create the rest of the joints. Lay the gusset on top of the rafter joint to make sure that it fits and the top edges run flush. If it does, you can use it as a template to cut the rest of the gussets for your rafters. You must make a gusset for each side of every joint in your rafters. You’ll need a total of 8 gussets per completed rafter. If you have 6 rafters, you’ll need 48 gussets for the entire project.
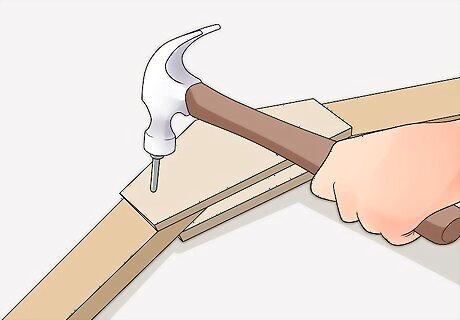
Nail the gussets into the rafter boards. Line the gusset back on top of the rafter joint. Nail 6d nails every 3 inches (7.6 cm) around the edge of the gusset directly into the rafter board. Continue attaching the gussets to all of the joints in the rafter. Then, flip the rafter over and nail the gussets onto the other sides of the joints. Use around 8-10 nails to secure the gusset to the rafter.

Construct full rafter pieces for each wall stud on your shed or barn. Repeat the construction process for the remainder of the rafters for your roof. Use the plywood staging area to construct each of the rafters. Remember that you’ll need a rafter to fit on each wall stud in your shed.
Raising the Roof
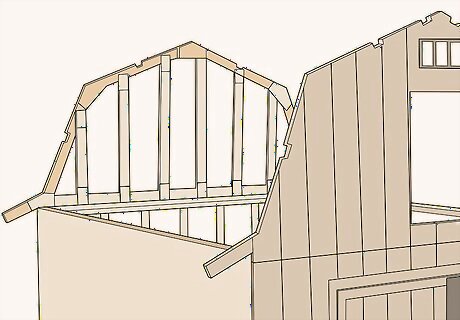
Hoist the rafters up on top of the shed or barn roof. Get help from 2-3 friends to help during this stage. Put ladders on both sides of the barn or shed and have one person inside of the shed. Hoist the rafters on top of the shed and line it up so that it runs flush with the wall stud.
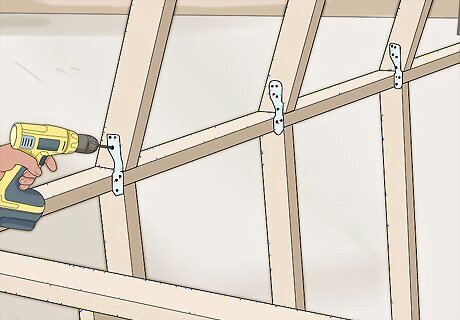
Screw the rafter into the wall. Position a metal joint plate between the rafter and top of the wall. Drive 2 3-16d nails through the board of the rafter on an angle so that it goes through the rafter board and into the top of the shed wall. Go to the other side of the rafter board and nail it in with a metal joint as well. You should have a joint plate on each side of the rafter boards.
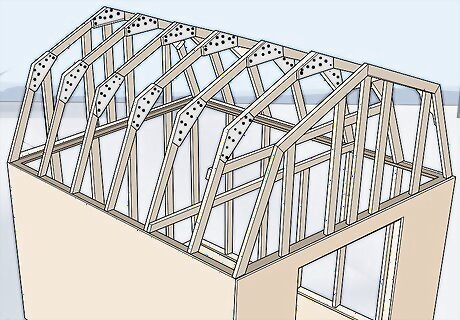
Install all of the rafters for the roof. Install a rafter for every wall stud in your barn or shed. Take your time on each rafter and make sure that the edges of the rafter run plumb before moving onto the next rafter. You can install braces with 2 in × 4 in (5.1 cm × 10.2 cm) boards on each side of the rafter if you’re having trouble keeping them in place.
Measure and cut OSB or plywood for the roof sheeting. Measure 4 total pieces of .5 inches (1.3 cm) thick OSB or plywood. These pieces should be half the length of your structure and the width of each piece of your rafter. So for example, if your barn is 10 by 12 feet (3.0 m × 3.7 m), each piece of OSB should be 6 by 3.83 feet (1.83 m × 1.17 m).
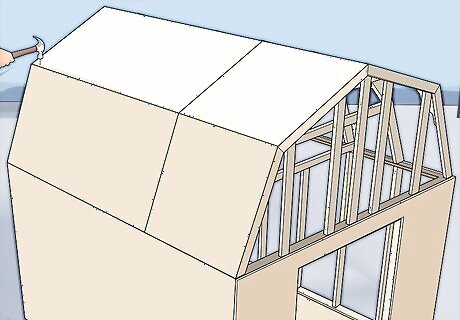
Nail OSB or plywood onto the rafters to enclose the roof. Start with the top corners of the roof first. Place the OSB or plywood on the top portion of the rafters and make sure that the edges run flush. Nail along the edges of the OSB or plywood, driving the nails into the rafters every 8 inches (20 cm) with 8d common nails. Repeat this process until your roof is completely enclosed. If the edges don’t run flush, you’ll have to recut your OSB or plywood. You can also use OSB to cover the front and back portion of the roof.


Comments
0 comment