
Creating the Foundation Row

Choose a medium-weight cotton yarn and size J-10 (6.0 mm) hook. It’s important to use cotton yarn so that your bikini will hold up after multiple washes. You can find cotton yarn in a craft supply store in a wide range of colors. Choose a medium-weight cotton yarn that you like and get a size J-10 (6.0 mm) crochet hook. Pick your favorite color or use a variegated yarn for a more colorful bikini top. Variegated yarn contains multiple colors so it will look like you changed yarn while making the bikini.

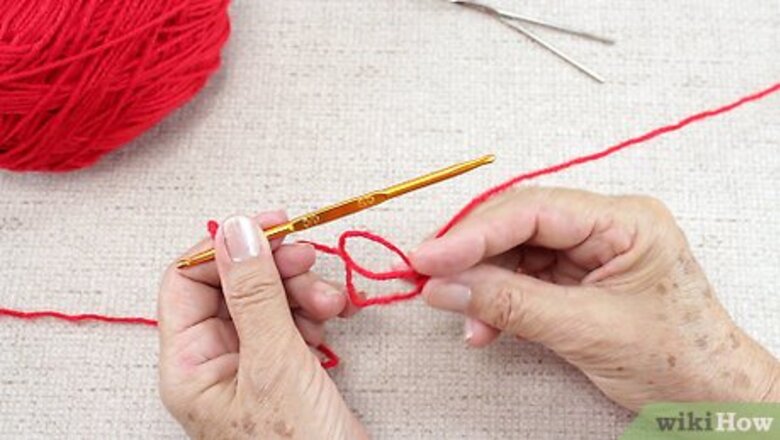
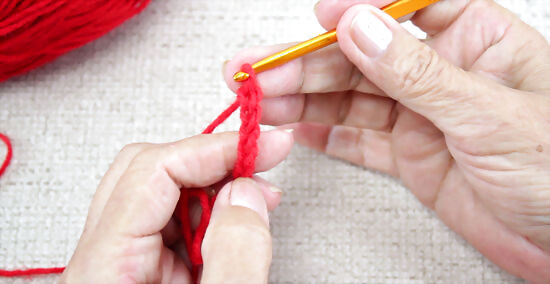
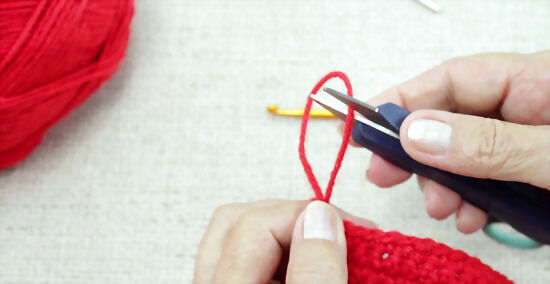
Make a slipknot and tighten it on your hook. Wrap the yarn around your index and middle finger 2 times and pull the first loop through the second loop. Tighten the loop around 1 finger and then slip it onto your crochet hook. Tug the tail to tighten the slipknot around the hook so that it is snug.
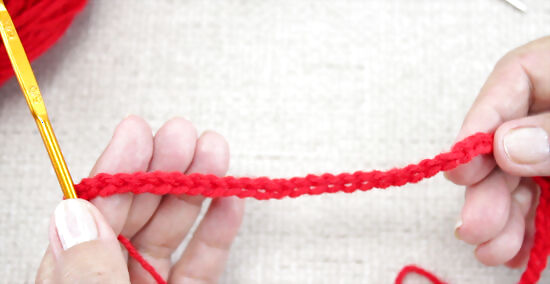
Crochet a chain long enough to cover your bust. Loop the yarn over the hook 1 time and then pull this loop through your slipknot to make 1 chain. Repeat this about 45 more times or as many as needed to create a chain that covers the width of your chest in the front. Hold 1 end of the chain under 1 armpit and the other end of the chain under the other armpit to check. The chain is finished when it’s long enough to go from 1 armpit to the other while snug against your chest. Keep in mind that the bikini top is attached with adjustable ties, so it’s not necessary to get a specific bust measurement before you begin. However, knowing your cup size or the cup size of the person who will wear the bikini may be helpful for sizing later on.Tip: Don’t worry about the sides or back of your bust. You’ll make these parts later.

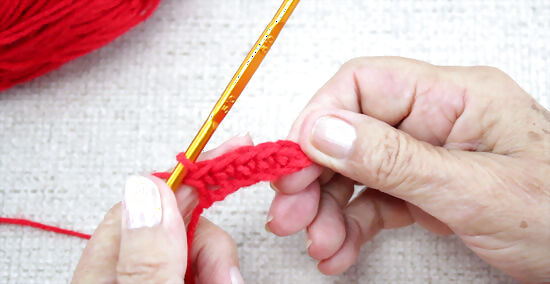
Chain 3 extra stitches to begin the first row. After you have a chain that is long enough to cover your chest, chain 3 more stitches. Loop the yarn over the hook 1 time, then pull through to make 1 chain. Repeat this 2 more times for a total of 3. These 3 stitches will count as the first double crochet stitch in your first row.

Double crochet into the fourth chain and continue to the end. Yarn over the hook 1 time and then insert the hook into the fourth chain from the hook. Yarn over again and pull 1 loop through the chain. Then, yarn over again and pull through 2 loops. Yarn over 1 more time and pull through the last 2 loops on the hook. This completes 1 double crochet stitch. After you complete the first stitch, double crochet into the next chain in the row. Continue to double crochet 1 time into each stitch until you reach the end of your first row.
Repeat the row 3 to 5 times to complete the band. Chain 3 and turn your work around to begin a new row. Then, double crochet across the row just as you did the last one. Repeat this for a total of 3 to 5 rows depending on how wide you want the band at the bottom of the bikini to be. If desired, you can work 2 to 3 rows in the shell stitch instead. This is a more intricate stitch, but it will create a decorative design on the bottom band of the bikini.
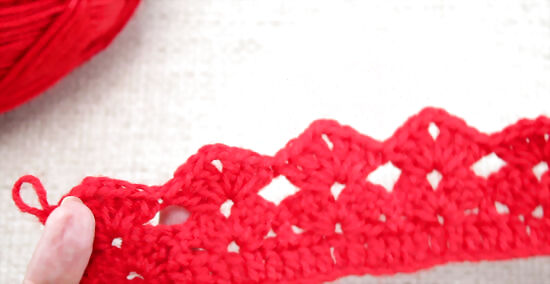
Cut and tie off the last stitch when the band is the desired width. Once you finish working the bottom of the bikini in the desired stitch, pull out the last loop by about 3 in (7.6 cm). Then, cut the yarn about 3 in (7.6 cm) from the last stitch in the row. Insert the end through the loop and tug the tail to tighten the loop into a knot at the end of the row. Leave the excess yarn for now. You can trim it off along with any other stray ends of yarn later on.
Working the Cups
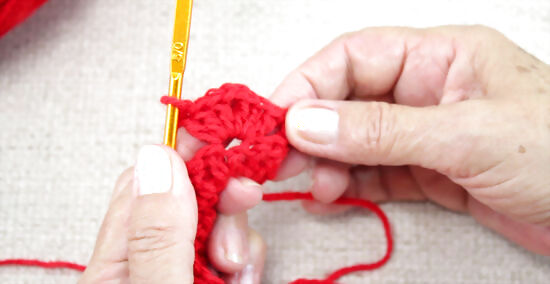
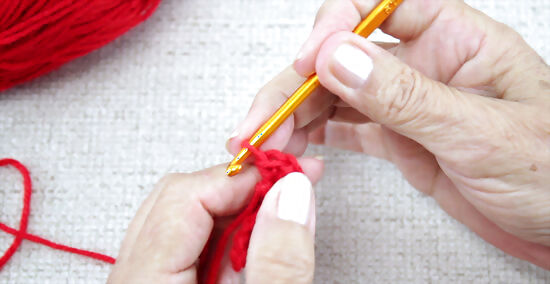
Make a slipknot and chain 6. Loop the yarn around your middle and index finger 2 times and pull the first loop through the second loop. Then, tighten the loop around your crochet hook. Yarn over the hook 1 time and pull through to make your first chain. Make 5 more chains for a total of 6.
Do single crochet across the chain. Insert the hook into the first chain and yarn over the hook. Then, pull this loop through the chain. Yarn over again, and pull through 2 to complete the first single crochet stitch. Repeat this to the end of the chain.
Work a total of 4 single crochet stitches into the last chain. When you reach the last chain, single crochet into it 2 times, then make a chain of 1, and then single crochet 2 more times into the same chain stitch. This will create a fan-like design at the end of the chain of 6 that will allow you to work around to the other side of it.
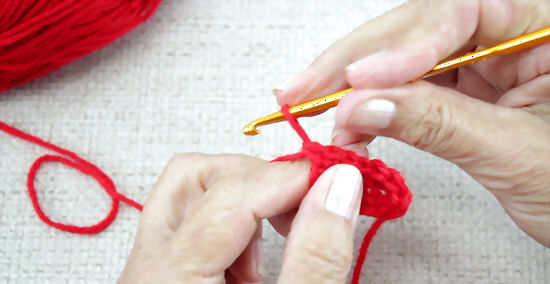
Single crochet along the opposite side of the chain. Continue to single crochet back up the chain on the opposite side of the fan. Work 1 single crochet stitch into each of the chains going back towards the other end of the chain. Keep your stitches tight to ensure that the bikini cups will provide full coverage.

Chain 1 and turn your work around. Once you reach the beginning of the chain again, make a chain of 1. Then, turn your work around so it’s facing you from the opposite direction.Tip: Work the bikini top cups in a U shape rather than in rounds. This will keep 1 side of the cups relatively flat and make it easier to sew it onto your bikini band.

Repeat the sequence until the cup is the desired size. Single crochet 1 time into each of the stitches until you get to the chain 1 space. This is the space you created between the 2 sets of 2 single crochet stitches in the last row. Then, single crochet 2 times, chain 1, and then single crochet 2 more times into the chain 1 space. Work 1 single crochet stitch into each of the stitches on the opposite side of the fan as well. Continue to work the cup using this pattern until the cup is the desired size. Determine when it is finished by placing it against your breast or comparing the size to a pre-made bikini top cup. You can also measure the cup for an approximate size. This pattern makes a simple triangle top bikini. Across the widest part of the triangle, an A cup will measure 4–4.5 in (10–11 cm), a B cup will measure 5–5.5 in (13–14 cm), a C cup will measure 6–6.5 in (15–17 cm), and a D cup will measure 7–7.5 in (18–19 cm).
Cut and tie off the last stitch. When the cup is the desired size, pull the loop through by about 3 in (7.6 cm). Cut the yarn 10 in (25 cm) from the last stitch in the row. Then, insert the end of the yarn through the loop. Tug the tail to tighten the loop into a knot around the tail. Leave the tail for now. You can use it to sew the bikini cup onto the band later on.
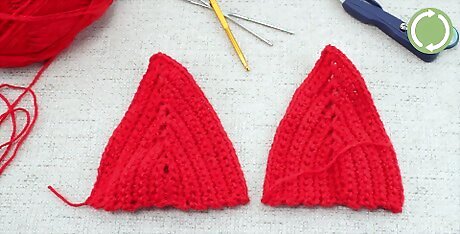
Make the second bikini top cup in the same way as the first. This will ensure that your bikini top cups are equal in size and shape. Use the first cup to help you determine when to stop making the second cup.
Finishing the Bikini Top
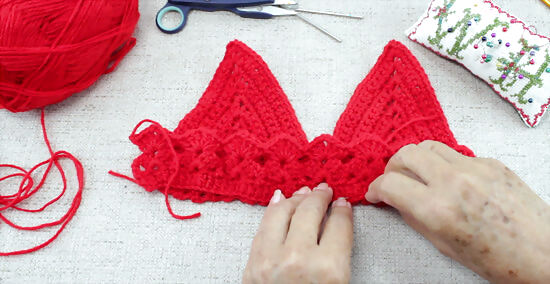
Position the top edge of the band along the bottom edges of the cups. Place the band on a clean, flat surface, such as a table or bed. Line up the bottom edges of the cups with the top edges of the band. Identify where you want the cups to go and insert 2 to 3 pins through the edges of the cups and band to secure them. Then, check the placement of the cups by holding the top against your chest or a pre-made bikini top. Adjust the placement of the cups if needed.Tip: If you went with a decorative stitch for the band, then the top edge will be the flattest edge of the band.

Use a yarn needle to sew the cups to the band. Insert the end of the tail on 1 of the cups through a yarn needle. Begin sewing in and out of the stitches along the edges of the cup and the band to secure them together. Go in through 1 side of the band and come out of the other side. Then, insert the needle through a stitch on the opposite side of the cup and bring it back out the other side. Repeat until you reach the end of the cup and then cut and tie off the yarn. Repeat this for both cups to secure them to the bikini band.

Make 4 chains long enough to secure the bikini. Crochet a chain that is long enough to go all the way around the back of the bikini. Hold 1 end of the chain against the end of the band and check to see if you can pull it under your arm and across your back. This will likely be about 45 chains. Make a total of 4 chains this length and tie them off at the ends.

Secure the ends of the chains to the band and cups. Insert the tail of the yarn on the chain through a yarn needle and sew through the edge of the bikini a few times to tack it into place. Then, tie a knot thought the last stitch to secure the chain to the edge of the bikini top. Make sure to attach 1 chain to the edges of each end of the bikini band as well as to the tops of each of the bikini cups.
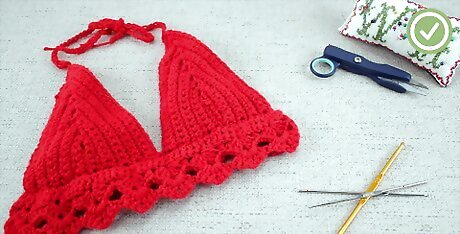
Cut any excess yarn on the ends of the chains. After you finish securing the chains to the bikini, cut any excess yarn that is left hanging on the bikini. There will likely be a few stray threads along the edges where you tied off the bikini strings, so cut these about 0.25 in (0.64 cm) from the knot so they will be less visible. Once you finish cutting the excess yarn, your bikini top is finished! Try it on and see how it looks.


Comments
0 comment