

Pre-Hung Door

Make a rough opening for the door. A pre-hung door comes with an existing frame, so remove the old trim and frame first to make a rough opening for the new frame. Once that's done, use a level to make sure the floor is plumb (perfectly straight).
Install shims to level the floor if needed. Place the level on the floor. Determine if the hinge side is lower than the latch side. If it is, add shims underneath the level on the side nearest to the hinges. Keep adding shims until the floor is level. Use a finish nail to tack the shims in place. You don't need to shim the floor if the latch side is lower.
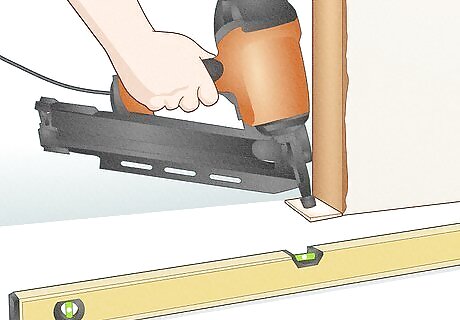
Add shims to level the hinge side of the rough opening if it's not plumb. Line up your level on the hinge side first. Place shims underneath the level until it is plumb. Nail the shims in place.

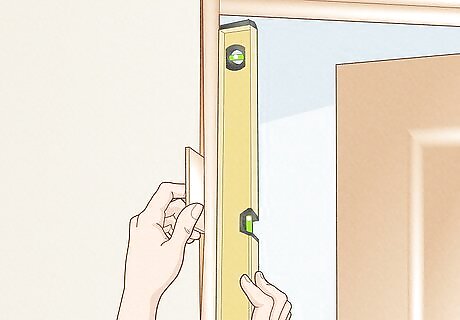
Push the pre-hung door into the rough opening to see how it fits. Determine if it is flush, meaning that it lines up perfectly with the rough opening. To do so, push the door until it is right up against the rough opening.
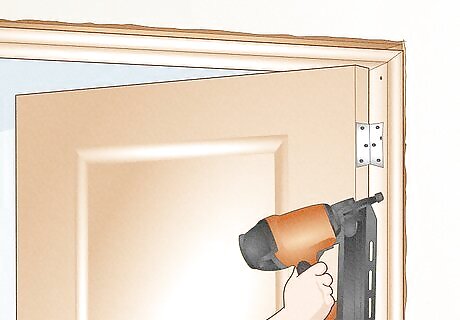
Nail the doorframe in place on the hinge side. On the hinge side of the doorframe, line up an 8d finish nail with the placement of the 3 hinges on the door (1 nail for each hinge). Hammer the nails through the frame and into the rough opening to securely fasten them together.
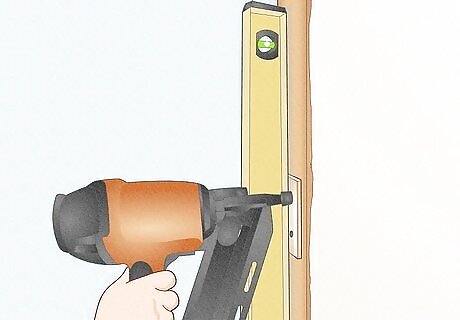
Shim the other side of the doorframe until it is plumb. Before securing the frame in place on the side of the door opening (the side with the doorknob), use your level to check that the rough opening is plumb (perfectly level). If it's not, nail wooden shims to the rough opening until it is.
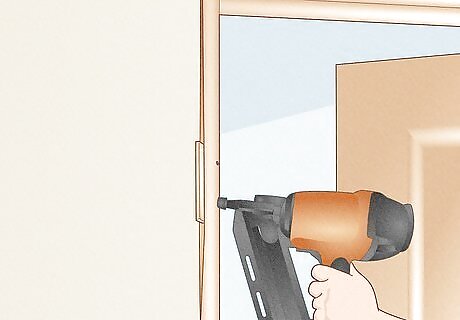
Fasten the opening side of the doorframe to the rough opening. Hammer 8d finish nails through the frame, shims, and rough opening. This securely fastens the opposite side of the frame.
Door Slab
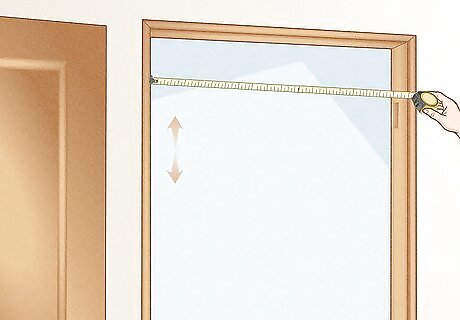
Measure the width and height of the doorframe and your door. Your doorframe will need to be ⁄4 inch (6.4 mm) taller and wider than the new door. That way your new door will have room to fit within the space. Measure your new door to determine if it's the right size for the doorframe. Compare the length and width measurements to the doorframe, and make sure the door frame is ⁄4 inch (6.4 mm) smaller in width and height. Don't worry if the door is a little too big for the frame. You can adjust the size of your new door to fit.
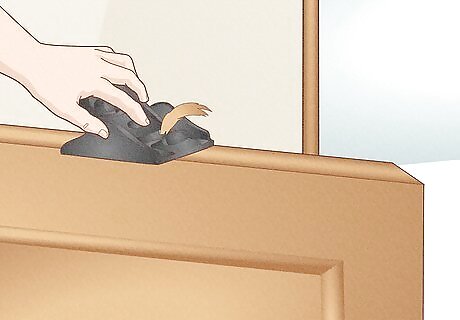
Cut the new door to size. Use a hand plane to trim the door’s width and height if it only needs to be trimmed less than ⁄8 inch (3.2 mm). If the door needs to be trimmed more substantially, use a circular saw. If you need to use a circular saw, use painter’s tape to mark where the door needs to be trimmed. When shortening the door’s height, cut at the bottom side of the door. If the width needs to be reduced, trim evenly on both sides.
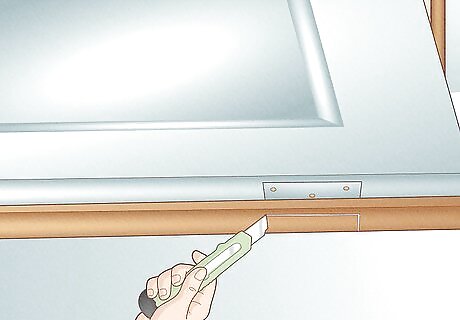
Score the door to place the lockset and hinges. Use the old door as a template to help. Remove the lockset and place the old door on top of the new door. Note where the hinges are located on the old door and mark the corresponding placements on the new door using a utility knife. Next, use a pencil to trace where the knob was located on the old door. Mark where the old latch was located as well. Trace its shape on the new door. This makes 2 circles that correspond to the doorknob and latch on the new door. To really ensure exact measurements, clamp the two doors together. Use a utility knife for scoring to make sharp, clean lines.
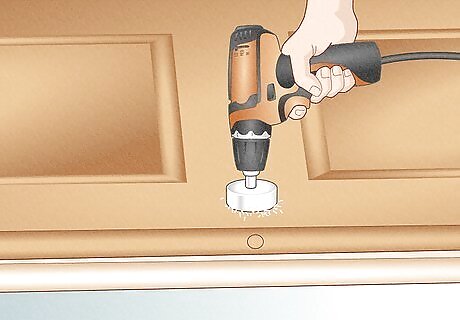
Drill a hole the size of the circle you've marked on the new door. Use a hole saw to drill halfway through the door and then stop. Flip over the door and drill the rest of the way through the hole on the other side. Turning over your door halfway through helps you avoid splinters and encourages clean, sharp cuts.

Use a spade bit to drill the hole for the door latch. To make this easier, place the new door on its verticle edge. Drill the hole in the exact circular shape that you marked for the new latch. It needs to be exact so that the latch functions correctly. After you’ve drilled the hole, temporarily secure the latch and faceplate into the door to make sure it all fits.
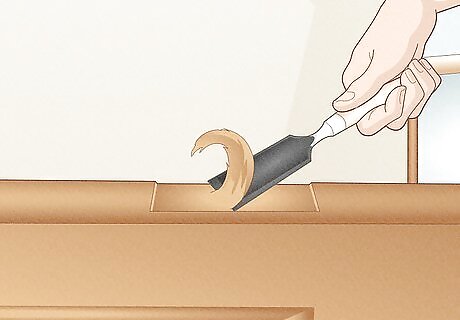
Chisel out spaces to secure the door hinges and doorknob faceplate. Use the marks you made with your utility knife as a guide. Keep the bevel of your chisel down and gently tap it with a hammer. Remove the wood to correspond with the space you’d marked earlier. Make sure to get rid of any splinters or remaining wood to ensure a clean space for the new hinges and faceplate.
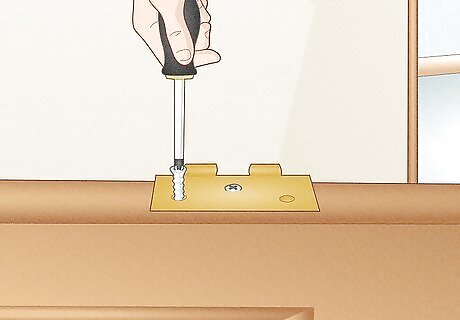
Screw half of the hinges into their corresponding mortises. This half is the portion that includes the inner knuckles. Use a center punch to screw the hinge leaves to the door in their correct mortise placements.

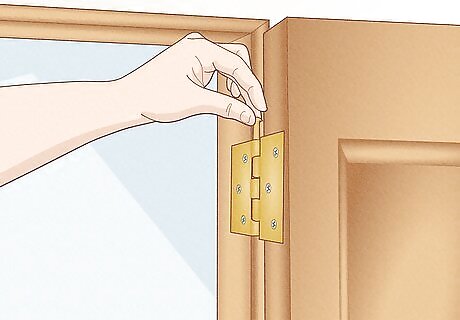
Screw the other half of the hinges onto the door frame to secure the new door. Make sure the placement corresponds exactly to the placement of the hinge leaves and knuckles on the door. If it doesn't, adjust the hinge leaves and knuckles until they fit together securely.
Hang the door in the frame. First, position your door to correspond with the hinges in the doorframe. Fit the knuckles on the new door within the hinges that are screwed to the door jamb. Hang the new door by dropping in the hinge pins. Place the hinge pins within the corresponding place in the hinges. Use a hammer to secure them in place. If the hinge knuckles don't fit within the hinges on the door jamb, you may need to adjust the placement of the hinges on the new door.
Latch and Lockset

Use a hand screw to install the latch. This will help you avoid over-tightening the screws and breaking any delicate pieces. Position the angled part of the latch so that it faces toward where the door will hit the jamb when closing.
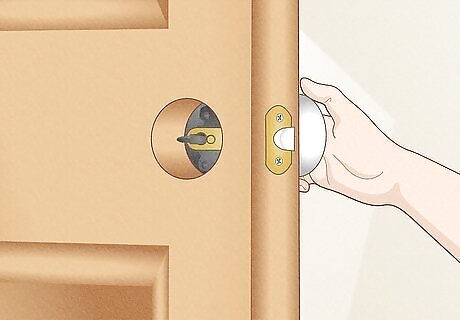
Secure the connecting rod of the doorknob to the hole in the latch. This will be used to connect both sides of the doorknob on either side of the door. Place the other side of the doorknob on top of the corresponding screw holes to line them up perfectly.
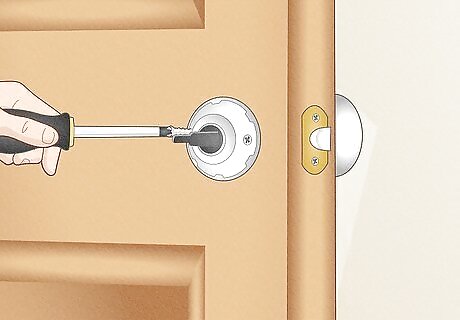
Screw both sides of the doorknob in place. Use the screws that came with your new doorknob. Tighten them in place with a hand screw. That way you won't over-tighten the doorknob and risk it not working properly. Test out how the doorknob twists and controls the latch. Make sure the latch still moves with the doorknob.


Comments
0 comment