
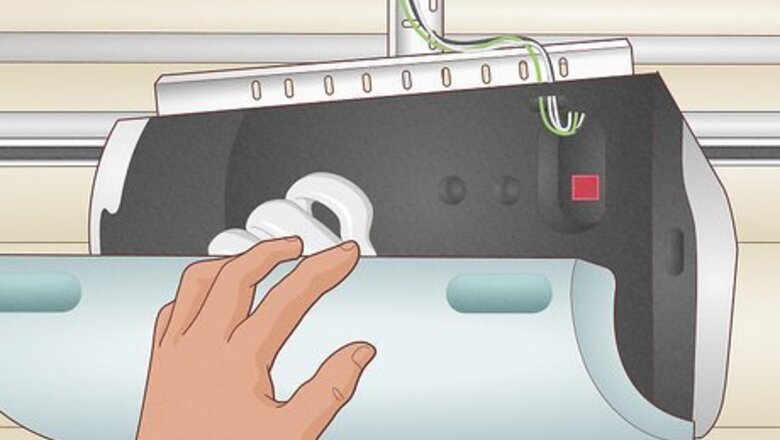
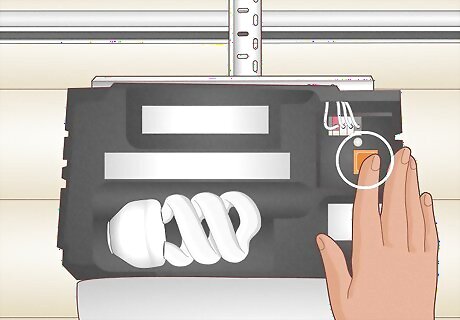
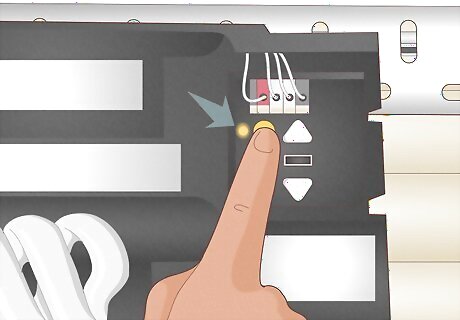
- Open the light panel on the motor attached to the ceiling of your garage. You may have to remove 2 screws from the top or side of the light cover to release it.
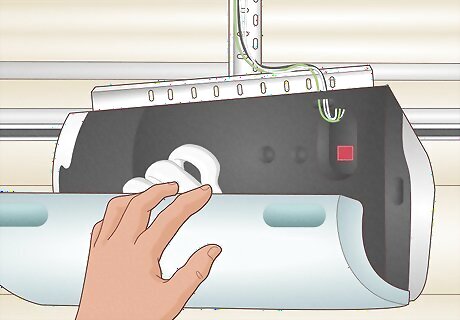
- Press the square “Learn” button under the light panel. The light above the button or on the keypad will turn on.
- You’ll have 30 seconds to enter a new 4-digit code on the keypad. Press the “Enter” button, and the motor light will blink or click once to confirm the code change.
Resetting a Craftsman or Other Garage Opener
Open the light panel on the garage door motor. Most light panels can be removed by gently pulling on the top or pulling the two tabs on the top or bottom that connect the cover to the motor. On some models, you may have to remove 2 screws from the top or sides of the cover to remove it. This method might work for all garage door opener keypads, including Craftsman openers.
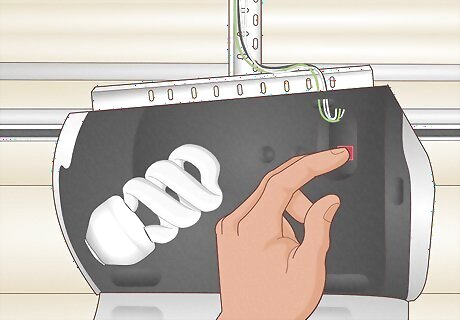
Press the “Learn” button under the light panel. Once you press the button, the LED light just above it, or the light in the keypad will turn on. This light indicates that you have 30 seconds to enter a new code. The “Learn” button on the back of your motor might be a red/orange, green, or purple square or a yellow or black circle.
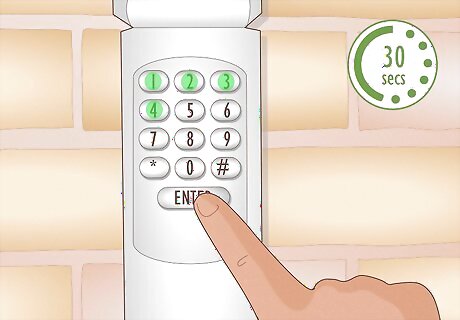
Enter a new code on the keypad within 30 seconds and press “Enter.” Most garage door keypads require you to enter a 4-digit code. Once you press “Enter,” the light on the motor will flash once or click twice to confirm the new code change.
Resetting a Chamberlain LiftMaster Garage Opener
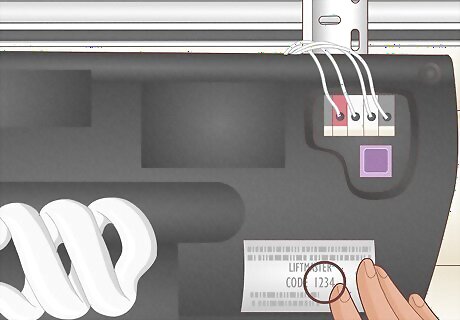
Open the light panel on the motor and find the “Learn” button. Unscrew or unclip the light cover from the motor attached to your garage ceiling. Find the square or circle “Learn” button underneath—the color of the button tells you how many times to press it when resetting the code: 1 Time: Yellow “Learn” button. 2 Times: Purple “Learn” button. 3 Times: Red/orange “Learn” button. 4 Times: Green “Learn” button.
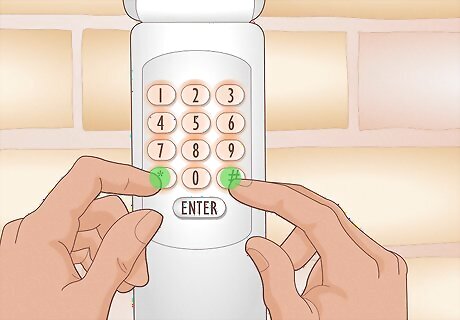
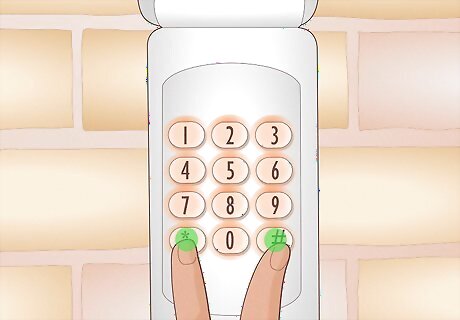
Press the pound (#) and star (*) keys until the keypad light turns off. Once you press both keys, the keypad light will flash rapidly. Hold the buttons until the keypad lights stop blinking and turn off.

Enter a new 4-digit code and press the pound (#) key. You’ll enter this same code again later to sync your keypad with your garage door motor.

Press the “Enter” key the number of times according to the “Learn” button color. This is the number you found in the first step when you found the “Learn” key on your garage door opener motor. 1: Yellow “Learn” button. 2: Purple “Learn” button. 3: Red/orange “Learn” button. 4: Green “Learn” button.
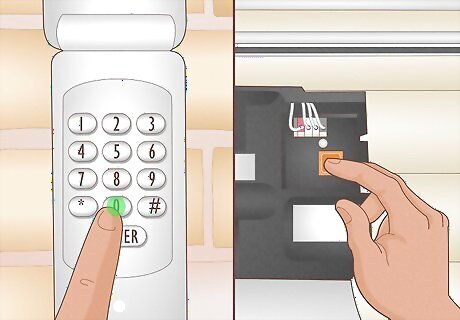
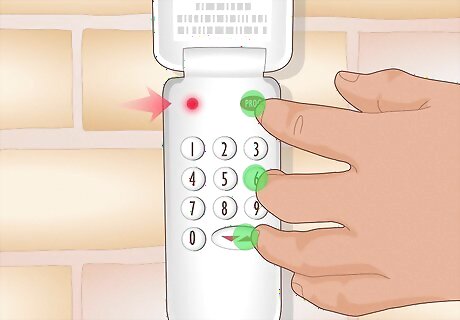
Press the “0” key, then press the “Learn” button on the motor. After you press and release the “Learn” button, the LED above it will light up. This signals the start of a 30-second timer for you to enter your new code.
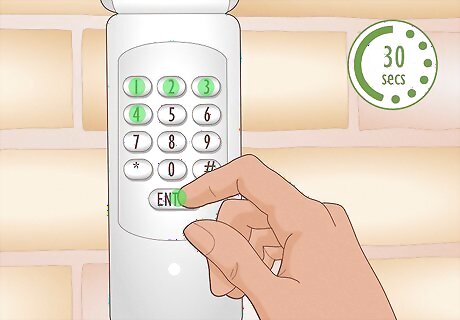
Enter your new code within 30 seconds and press “Enter.” Once you press “Enter,” the garage door opener motor lights will flash or you’ll hear 2 clicks that confirm your new code. To test your new code, enter your code and press “Enter.” Your garage door should activate. If the keypad doesn’t open the door or light up, the battery might be dead. Unscrew or slide the bottom plastic panel down and replace the battery with a new 9 or 12-volt battery.
Resetting a Universal LiftMaster Garage Opener with No “Enter” Key
Find your unit code information under the light cover on your motor. Take note of the keypad manufacturer. Unscrew or unclip the light cover on your LiftMaster motor and look at the color of the “Learn” button and the manufacturing date. The manufacturer of the keypad, the date, and/or the color of the button indicates what unit code number to enter later: 2: Chamberlain, Sears Craftsman, LiftMaster, Master Mechanic, and Do It openers manufactured from 1997 to 2004 (Orange/Red “Learn” button). 3: Chamberlain, Sears Craftsman, LiftMaster, Master Mechanic, and Do It openers manufactured from 2005 to present (Purple “Learn” button). 4: Chamberlain, Sears Craftsman, LiftMaster, Master Mechanic, and Do It openers manufactured from 1993 to 1996 (Green “Learn” button). 5: Genie Intellicode and Overhead Door openers manufactured from 2005 to present. 6: Genie Intellicode and Overhead Door openers manufactured from 1995 to present. 7: Stanley garage door openers manufactured from 1998 to present. 8: Chamberlain, Sears Craftsman, and LiftMaster openers manufactured from 2011 to present (Yellow “Learn” button). 9: Wayne Dalton openers manufactured from 1999 to present. 10: Xtreme Garage openers manufactured from 2016 to present. 11: Sommer openers manufactured from 2013 to present. 12: Ryobi openers manufactured from 2016 to present.
Press the pound (#) and star (*) keys until the keypad light turns off. Once you press both keys, the light behind the keypad will flash—keep holding them down until the light goes off. This confirms that your current code is erased from the keypad’s memory.

Enter your new code and the unit code, pressing the pound (#) key after each. Within the 10-second time limit, enter your new 4-digit code and press pound (#). Then enter the unit code number you found in the first step and press pound (#). If the keypad light turns off before you enter both codes, repeat the previous step and try again.

Press the “Learn” button, enter your new code, and press the “0” key. Go to the motor and quickly press and release the “Learn” button. Go back down to the keypad and enter your new 4-digit code again, then press and release the “0” key. Test out your new code by entering it and pressing the “0” key until the door activates. If you have a Genie or Overhead Door garage door motor, press the “0” key twice. If this doesn’t work, unscrew the small rectangular plate on the bottom of the keypad. Flip the switch inside to “program.” Enter your new 4-digit code, then flip the switch back to “operate.”
Resetting a Genie Intellicode Garage Opener
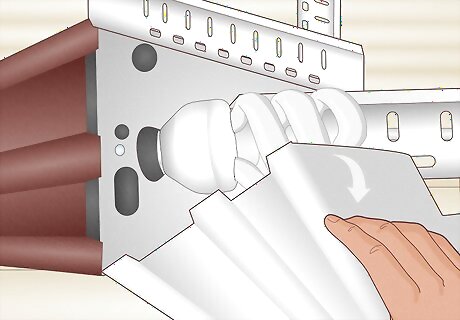
Open the light cover on the garage door motor. Some models allow you to unclip the light cover around the top or the sides of the motors. On others, you may have to unscrew the 2 screws at the top of the motor to release the cover. You may need to unscrew the lightbulb inside the light cover to see the LED light above the “Learn” button more clearly.
Press the “PROG,” “6,” and down-up arrow keys at the same time. Use 3 fingers to press each button at the same time, until the flashing LED near the top of the keypad turns off. This will reset the code on your garage door keypad. “PROG” stands for “program.”
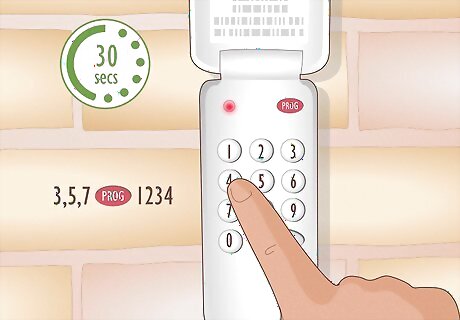
Press “3,” “5,” “7,” and “PROG” in order and enter a new 4-digit code. The LED light near the top of the keypad will flash slowly, giving you about 30 seconds to enter in a new code. After you enter your new 4-digit code, the LED light will turn off.
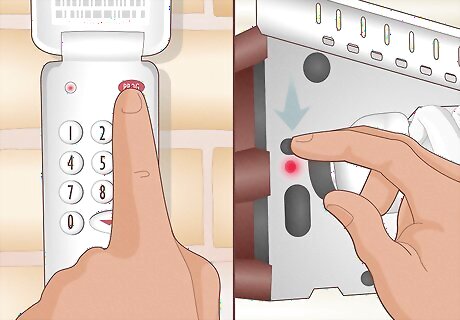
Press “PROG” and then push the “Learn” button on the garage motor. After you press “PROG,” the LED light will blink 3 times and turn off. The square or circle “Learn” button is typically located underneath the light cover on the back of your garage door motor.
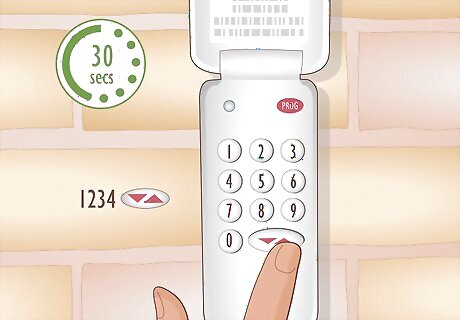
Enter your new 4-digit code again and press the down-up arrow key. Once you press the “Learn” button, the LED light starts to blink, signaling that you have 30 seconds to enter your new code. Once you enter the new code, the LED light will stay on.
Press the down-up arrow key once more. Now your code should be registered, and the LED light on the back of the motor will turn off. To test it out, make sure the light behind the keypad numbers goes out, enter your new code, and press the down-up arrow key. The door should activate. If the door doesn’t activate, you may need to replace the batteries located under the battery cover below the keys on the keypad. Then, repeat this method.
Resetting a Handheld Garage Opener Remote

Open the light panel on the garage door motor. Most light panels can be removed by gently pulling on the cover or on the tabs on the top or sides of the motor. Depending on your model, you may have to unscrew the cover to open it. If you have a LiftMaster remote that isn’t working, open the LiftMaster wall panel. If the light is rapidly flashing, your remote has been locked out. Press and hold the “LOCK” button until the light stops blinking to unlock it. If the light on your remote doesn’t blink when you press the button, replace the battery before resetting the code. This method resets the garage opener system and may cause all of your garage opener remotes to stop working. Repeat this method for all your remotes to connect them again.
Hold the “Learn” button until the LED light turns off. When you press the button on the back of the garage door motor, the LED light just above it should turn on. When the light turns off after about 6 seconds of pressing the button, you have disconnected all the remotes from the motor. Depending on your garage opener model, the “Learn” button on the back of your motor might look like a red/orange, green, or purple square or a yellow or black circle.

Press the “learn” button, then press the button on the remote. After you press and release the “Learn” button, you will have 30 seconds to press the button on your remote. The LED light above the “Learn” button should flash and turn off, signaling that it has registered the remote. If the remote still doesn’t work, try unscrewing the lightbulb before repeating this method. Some LED lightbulbs may interfere with the frequencies of your motor and remote.
Setting a Temporary Garage Door Code

Enter your regular pin and press star (*). After pressing the star (*) button, the light on the garage motor will blink 3 times. A temporary garage door code can allow others to have access to your garage for a set amount of time.

Enter your 4-digit temporary code and press “Enter.” This code can be whatever you’d like, as long as it has 4 digits and it’s different from your current code. The light on the garage motor will blink 4 times.
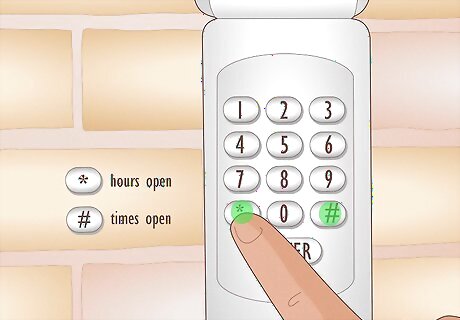
Enter how long the code will be active with the star (*) or pound (#) keys. Press a number key, then press star (*) for the number of hours or the pound (#) key for the number of times the garage door can be opened. After entering the duration of the code, the garage door opener will blink or click once. If you’d like the garage door to only be opened twice with the temporary code, press “2” and the pound (#) key.


Comments
0 comment