
Hanging a Single Shelf
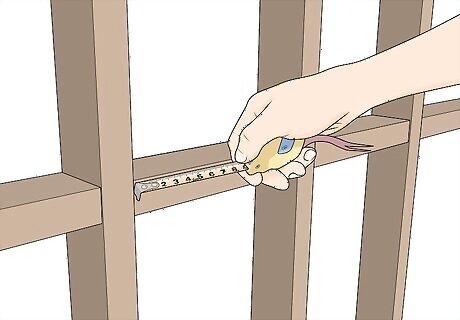
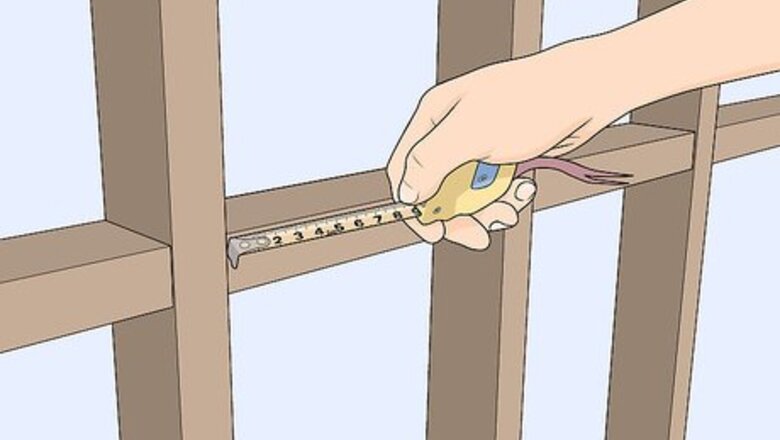
Measure the distance between wall studs where you want to place your shelf. Choose a spot in your garage where you want to place your shelf. Start your tape measure on one of the wall studs and extend it to the length you want your shelf to be so it ends on another wall stud. Make sure the tape measure stays straight and level or else your measurement won’t be accurate. Mark the measurement down on your wall or write it down so you don’t forget. Use a level to double-check if your tape measure is straight while you’re taking your measurement. Consider the height of the items you want to store on your shelf so you can plan to have enough room. Usually, studs in a garage are exposed, but you may need to use a stud finder to locate any behind drywall.
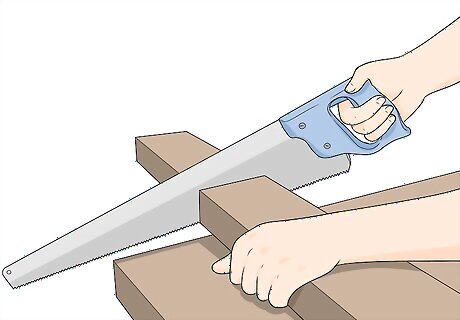
Cut 2 in × 4 in (5.1 cm × 10.2 cm) boards to use for the frame. Use a handsaw or a bandsaw to trim 2 boards to match the length measurement you took in your garage. Then cut boards that are 16 inches (41 cm) long to use as your sides and braces. The number of side and brace pieces you need equals the length of the shelf divided by 2 ⁄2 feet (0.76 m) plus 1. Cut all of the pieces you need for your shelf framing. For example, if you want a shelf that’s 5 feet (1.5 m) long, then cut 2 boards to 5 feet (1.5 m) long and 3 boards so they’re 16 inches (41 cm) long. If the length of your shelf doesn’t evenly divide by 2 ⁄2 feet (0.76 m), then round up so you have an extra brace piece. You may be able to ask employees at a home improvement store or lumberyard to cut your wood for you when you purchase it. When you’re finished, your shelf will be 18 inches (46 cm) deep. If you want it deeper, then cut the side and brace pieces 2 inches (5.1 cm) less than the planned depth. For example, if you want a shelf that’s 24 inches (61 cm) deep, then cut your braces to 22 inches (56 cm) each. Wear safety glasses if you’re working with a power saw to keep your eyes protected.
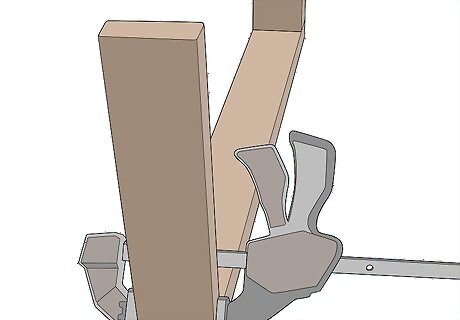
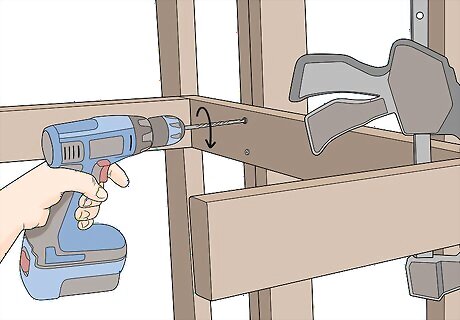
Assemble the back and side boards into a U-shaped frame. Lay one of the long pieces of wood flat on your work surface and clamp one of your 16 in (41 cm) wood pieces vertically to one end. Drill 2 pocket holes diagonally into the side of your 16 in (41 cm) piece toward the long board to hide your screws. You can use a dremel tool for this. Drive 2–3 in (5.1–7.6 cm) screws into each of the 4 pocket holes to secure the side in place. Repeat the process with your second side piece on the other end. You don’t need to use pocket holes if you don’t want to, but your screws will be visible on the side of the frame.
Screw the frame into the wall studs in your garage. Hold the frame against your wall so the longest board is against the studs and the side pieces are perpendicular to the wall. Ensure that it’s level on your wall so things don’t slide off the shelf once you install it. Start in the center of the frame and drive 2–3 in (5.1–7.6 cm) wood screws through the back piece to secure it to the wall studs. Use at least 2 screws per wall stud so the frame doesn’t move or wobble when you apply weight to it. Have a partner help you position the frame in place and hold it steady while you’re attaching it.Tip: If you have cement walls in your garage, then use screws meant for cement.

Attach the brace boards every 2 ⁄2 ft (0.76 m) along the back of the frame. Hold the brace piece, which is the same length as your side pieces, against the back board 2 ⁄2 feet (0.76 m) from one of the sides so it extends out from the wall. Screw the brace into the back board using 2 screws in pocket holes that are 2–3 inches (5.1–7.6 cm) long. Continue attaching your brace pieces along the length of the shelf’s frame until you reach the other end. Lay a level across the braces after you install them to make sure that they don’t tilt or sit crooked. If they do, then you need to remove the braces and reinstall them. You may need to adjust your brace pieces slightly if the length of your shelf doesn’t evenly divide by 2 ⁄2 feet (0.76 m).
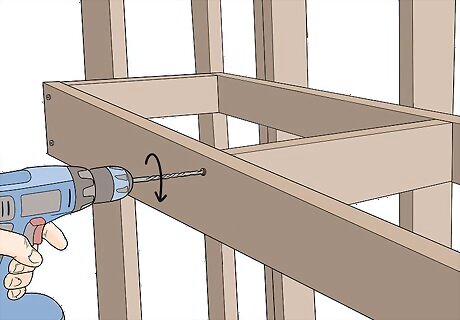
Screw the front board onto the frame. Hold the second long piece of your frame against the front edges of the braces and side pieces. Drive 2 screws that are 2–3 inches (5.1–7.6 cm) long through the front piece into the ends of the sides and braces to secure it in place. Check that the board is level after you attach each brace or side so it doesn’t hang crooked. If your shelf frame starts to dip down or sag, then place vertical boards between the shelf and the floor to support the weight while you’re working.

Secure plywood to the top of the frame with screws. Cut out a sheet of ⁄4 inch (1.9 cm) plywood to the same length and depth as your shelf using a handsaw or circular saw. Lay the plywood on top of the shelf and put in 2 in (5.1 cm) screws through to the frame under it. Place screws every 6 inches (15 cm) down the side and brace pieces so it’s held securely. You can use thinner plywood if you want, but it may not support the weight as well.

Install angled brace boards every 2 ⁄2 ft (0.76 m) for more support. Cut a number of boards equal to how many side and brace pieces you have to 16 inches (41 cm) long. Trim the ends of the boards so they’re at a 45-degree angle and look like a trapezoid. Place the angled end of the board against the bottom of the shelf next to one of the braces. Attach the angled pieces directly to the braces and sides with 2 in (5.1 cm) screws. Don’t put any weight on your shelf before you install the angle braces or else the screws could pull out of the studs and fall down.
Installing a Multiple Shelf System

Mark the height and length of the shelves you want to build on your wall. Start your tape measure on the floor and extend it up to the height you want your tallest shelf. Then, stretch your tape measure from one wall stud to another until you reach the length you want for your shelves. Write down your measurements so you don’t forget them. Make sure your measuring tape is level when you’re finding the length or your measurements may not be accurate.
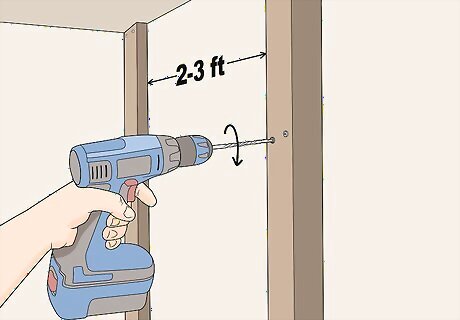
Screw vertical support boards into the studs in your wall every 2–3 ft (61–91 cm). Cut 2 in × 4 in (5.1 cm × 10.2 cm) boards so they’re 6 inches (15 cm) longer than the height of your tallest shelf. Hold the support board flat against your wall so it’s vertical and lines up with one of the studs. Drive a screw every 6–10 inches (15–25 cm) along the support board to secure it to the wall. Place additional boards along the wall every 2–3 feet (61–91 cm) or on each stud. For example, if you want to have a 6 feet (1.8 m) shelf, install 3 vertical support boards. If you have concrete walls, be sure to use screws meant to use for masonry.
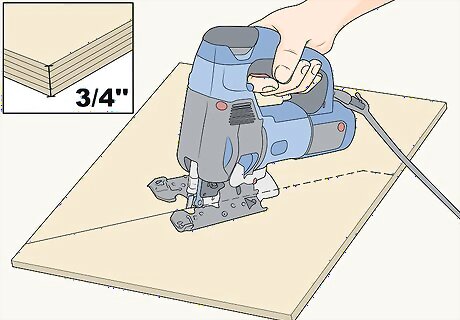
Cut angled pieces of ⁄4 in (1.9 cm) plywood to use as brackets. Draw right triangles that are 16 × 8 × 18 in (41 × 20 × 46 cm) onto a sheet of ⁄4 in (1.9 cm) plywood. Make sure you have 2 angled pieces per wall support for the number of shelves you plan on hanging. Cut the pieces out from the plywood using a jigsaw or a handsaw. For example, if you have 3 vertical support boards and want 3 shelves, then you’ll need 18 angled bracket pieces. Avoid using thinner pieces of plywood since they won’t support the weight of your shelf as well.
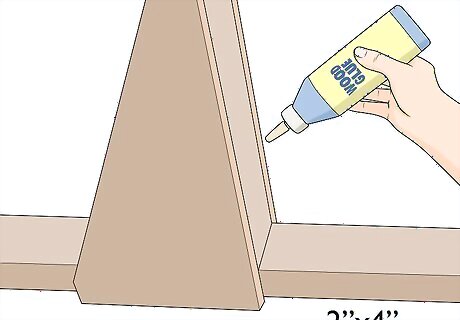
Glue a 2 in × 4 in (5.1 cm × 10.2 cm) board between each pair of brackets for added support. Lay a 2 in × 4 in (5.1 cm × 10.2 cm) board flat on your work surface to use as a spacer. Set another 2 in × 4 in (5.1 cm × 10.2 cm) board that’s 14 ⁄2 inches (37 cm) vertically on top of the board. Apply a thin layer of wood glue to the sides of the vertical board, and press 2 of the brackets on either side of it so the 16 in (41 cm) sides are flush with the top of the board. Clamp the brackets and board together until the glue sets the following day. Make sure there is a 1 ⁄2 in (3.8 cm) gap between the end of the board and the 90-degree corners on the brackets, or else they won’t fit on your supports.
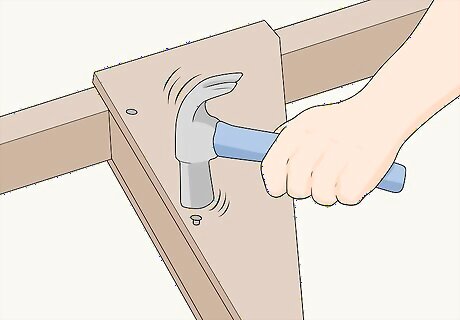
Nail the board between the brackets once the glue sets. Place a 1 in (2.5 cm) nail along the top edge of your bracket with the board. Drive a nail every 3 inches (7.6 cm) along the length of the bracket until you reach the end of the board glued between them. Be sure to nail in both sides of the bracket so it doesn’t fall apart. The brackets will support the plywood shelves and evenly distribute the weight so they don’t break. Don’t drive any nails in the gap between the end of the board and the ends of the triangular pieces or you won’t be able to attach it to your supports.

Attach the brackets to your vertical supports so the tops are level with one another. Space out the brackets along the supports so you have 24 inches (61 cm) vertically between them. Hold the bracket so it’s flush against the wall and the gap between the triangular pieces fits onto the support. Use 2 screws that are 2 in (5.1 cm) long on each side of the bracket to secure it to the vertical support. You can adjust the vertical distance between the shelves if you want to have more space for storing your things or if the height of your tallest shelf doesn’t evenly divide by 24 inches (61 cm). Lay a level between the brackets when you’re installing them to make sure they aren’t crooked.
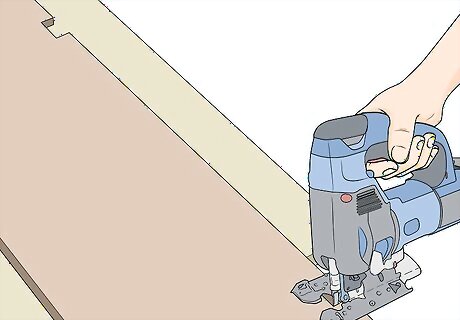
Cut notches in the plywood you’re using for the shelf tops. Trim your plywood so it’s 18 inches (46 cm) wide and matches the length of the shelf you want. Hold the plywood against the supports so you know where to cut your notches, and mark their location on the plywood with a pencil. Use a jigsaw or a handsaw to cut the notches out of the wood so it’s 2 inches (5.1 cm) deep. You can use the same plywood you used for your brackets.Tip: You don’t have to cut notches into your plywood if you don’t want, but it will leave a gap between the back of the shelf and the wall where things could fall.

Secure the plywood shelves on top of the brackets with nails or screws. Set the plywood on top of the mounting brackets and slide it into place so the back is flush with the wall. Drive 2 in (5.1 cm) nails or screws along the mounting brackets every 5 inches (13 cm) so it stays in place. Make sure you drive screws into every mounting bracket or else the shelf top will raise up from them. Once you secure the plywood, check if the shelf is crooked with a level to see if you need to make any adjustments.


Comments
0 comment