
Replacing a Standard Light Bulb
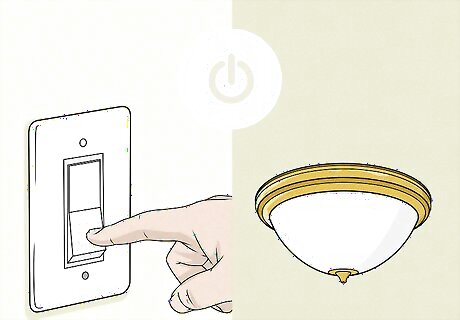
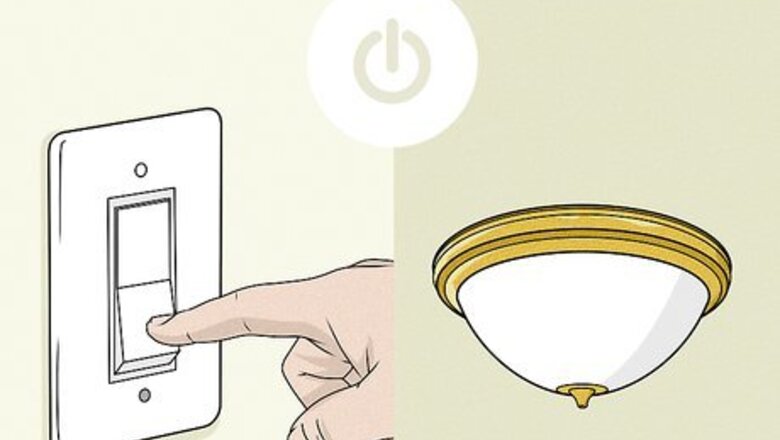
Turn off the fixture and allow the bulb to cool. Before changing any light bulb, always make sure you’ve turned off the light switch. Standard incandescent and halogen bulbs get too hot to touch, so let them cool before trying to replace them. It might take at least 15 to 20 minutes for a bulb to cool to room temperature. Before touching the bulb, hold the back of your hand close to it. Without touching it, use your hand to gauge how hot it is. Fluorescent bulbs don’t get too hot and might not need any time to cool. They’re designed to produce light without giving off much heat.
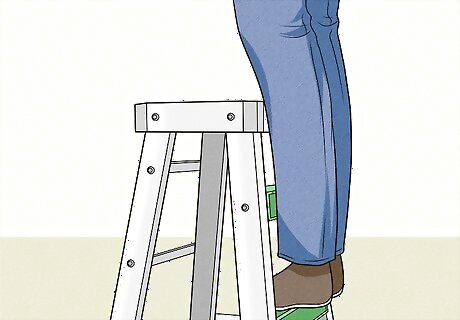
Use a ladder or step stool to reach the light fixture. Don’t try to stand on a chair or another not-so-sturdy object. If you can’t reach the bulb with a step stool, use an A-frame ladder. For standard 8 to 9 ft (2.4 to 2.7 m) ceilings, you can most likely reach the bulb using a step stool without any help. However, if you need to climb high up on a ladder to change a bulb, it’s wise to have a helper hold the ladder. Use a fiberglass ladder since metal conducts electricity and could lead to electrocution. Never stand on the top step of a ladder or step stool.
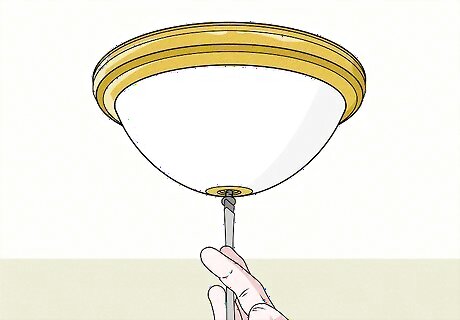
Loosen the screws if you're replacing the bulb in a dome fixture or fan. Most glass dome ceiling fixtures have at least 1 screw that keeps the dome in place. If you’re changing the bulb in a dome fixture, locate the screw on the side where dome meets the ceiling. For a ceiling fan, check the base of the dome where it connects to the fan body. Hold the dome in place as you turn the screw counterclockwise to loosen it. Instead of completely removing the screw, just loosen it until you can remove the dome. You’ll have an easier time removing the dome without dropping it, and you won’t have to deal with trying to get the screw back into the hole. If your dome doesn’t have any screws, check the tip at the center of the dome. See if you can turn it counterclockwise; the tip might conceal a nut and bolt that secures the dome. Be sure to hold the dome as you loosen the bolt. If your fixture doesn’t have a glass dome or cover, you can skip right to removing the light bulb.

Remove a stubborn dome with duct tape, if necessary. Unscrew the glass cover itself if there are screws or bolts that hold it in place. If the cover is stuck, tear off a 6 in (15 cm) length of duct tape. Hold the ends of the tape and fold the middle section in half to make a handle. Don’t let the ends of the tape touch each other as you fold the middle section. The result should be a T-shaped handle made by the folded middle section with 2 sticky edges on either side. Repeat the steps to make another duct tape handle. Stick the tape handles to the glass cover, then use them to turn the cover counterclockwise. You can also try spraying a lubricant, such as WD-40, around the edge of the cover where it threads into its housing. Use a thin straw nozzle attachment to reach the tight crevice between the cover and its housing.
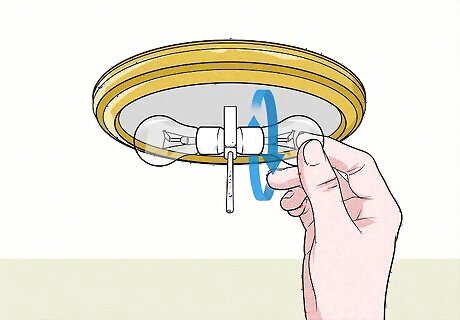
Take the old bulb out of the socket. Double check that the fixture is off and the bulb is cool to the touch. Turn the bulb counterclockwise as you pull it out of the socket.
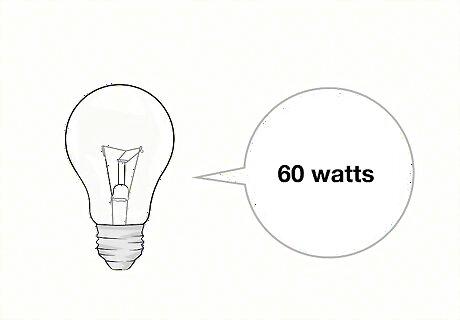
Purchase a replacement bulb with a matching wattage. Check for markings on the old bulb that indicate its wattage. If you don't have a matching bulb handy, buy a new bulb with the same wattage as the old one. If you’re replacing a standard incandescent bulb, consider replacing it with a CFL (compact fluorescent) or LED bulb with a matching wattage. These alternatives use 75 to 80% less energy than an incandescent bulb.

Install the new bulb. Insert the new bulb into the socket, then turn it clockwise until it’s tight. Take care not to turn it with too much force, or it might break. Before putting the ladder or step stool away, turn the fixture on to double check that the bulb works. If it doesn’t turn on, try a new bulb or check the circuit breaker. If all else fails, the fixture may be need to be replaced.

Replace the fixture’s dome or any other cover, if necessary. While you have it down, wipe down the dome or cover with glass cleaner. Make sure it’s dry, then replace it by reversing the steps you took to remove it. If the cover itself screws into a housing, check its threads and those in the housing. If there’s any buildup, clean the threads so you’ll have an easier time screwing the cover back into place. If the cover is secured by screws or bolts, hold it in place with one hand while you tighten the screw or bolt with the other. Recruit a helper if you have trouble doing both at the same time.
Changing a Recessed Light Bulb
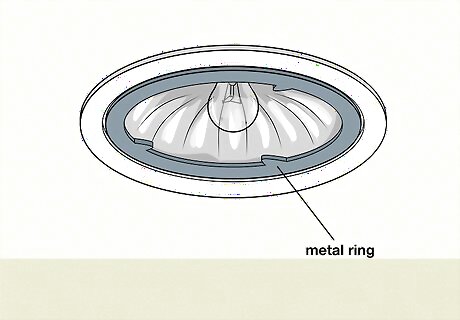
Check for a metal ring that holds the bulb in place. Some recessed light bulbs are secured by a retaining collar, which overlaps the bulb’s face. If there’s no collar, there should be a small space between the bulb and the casing. If there’s no space and you see a metal ring overlapping the bulb edge, remove the collar to replace the bulb. Remember to use a ladder or step stool to check for a metal collar. Additionally, make sure the fixture is off and the bulb is cool. If you don’t see a metal ring and there’s a small space between the bulb and the casing, you can skip right to removing the bulb.
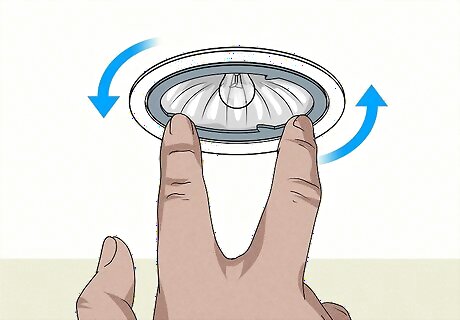
Remove the retaining collar by twisting it counterclockwise, pressing a button, or removing the screws. Before trying to remove the collar, check if you can twist it counterclockwise. For some recessed fixtures, you push upward slightly as you rotate the casing 1/4 to 1/2 turn counterclockwise. The bulb and socket then release and can be pulled out of the casing. Use light pressure when you try turning the collar. If it’s not designed to twist out, giving it a hard tug could cause damage. For newer designs, simply press a small release button or remove a screw to take out the retaining collar. Older designs use a spring-loaded metal ring, which you can carefully pry out with a flat-head screwdriver. To pry out a spring-loaded ring, insert the screwdriver between the outer ring and the retaining collar. Taking care not to strike the bulb, apply gentle inward pressure on the collar. The spring-loaded collar expands to keep the bulb in place. Your goal is to pry it inward to make the ring smaller, so it releases from the casing. Try to keep a hand on the collar so it doesn’t fall when you release it The bulb will still be connected to the socket, so it won't fall.
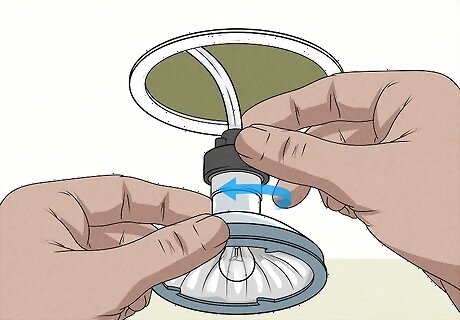
Remove the bulb by rotating it counterclockwise. If you have a fixture with a collar, simply twist the bulb out of the socket after removing the collar. While they’re more cumbersome, one advantage of collars is that you can pull out both bulb and socket. This makes it easier to grip and twist the bulb. Depending the type of bulb, rotate it 1/4 or 1/2 turn counterclockwise, or keep turning it until it’s out of the socket.

Use duct tape to twist out a bulb that doesn’t have a collar. Fixtures without collars don’t leave much room between the bulb and the casing for your fingers. To get a grip on the bulb, make a handle with a 6 in (15 cm) strip of duct tape. Hold the ends, and fold the tape in half to make a handle out of the middle section. Don't let the ends of the duct tape touch each other; you should have a T-shaped handle with 2 sticky ends on either side. Stick the ends to the bulb, grasp the tape's folded middle section, turn it counterclockwise, then remove it from the socket.
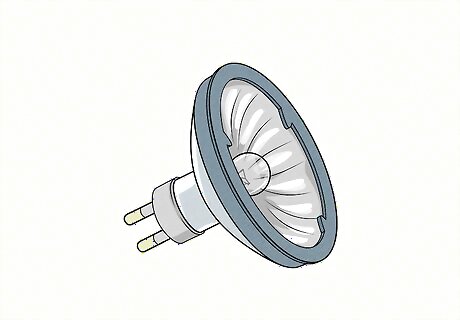
Purchase a new bulb that matches the old one. With so many types of LED recessed bulbs available, finding the right replacement can be tricky. If you don’t know the specific bulb you need, bring the old one to the hardware or home improvement store. Look for a matching bulb with the same wattage as the old one. If you can’t find a match at the store on your own, ask an employee for help finding the right bulb.
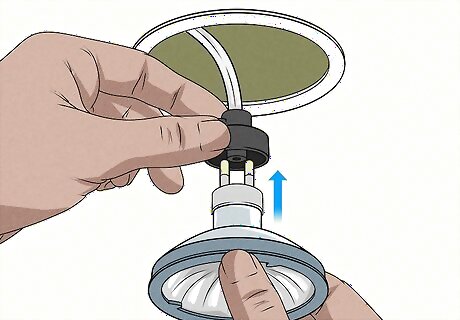
Install the new bulb. LED recessed bulbs with 2 or 3 prongs, line the prongs up with holes in the socket, then twist clockwise. Alternatively, if there are no prongs, simply insert the end of the bulb into the socket, then turn it clockwise. If you have a fixture without collar and can't get a grip on the bulb, use your duct tape handle to twist the it back into place. After installing the bulb, flip the switch and check to make sure it works.

Replace the retaining collar, if necessary. To replace the collar, reverse the steps you took to remove it. Either twist it clockwise back into place, drive the screw back in, or squeeze the spring-loaded metal ring back into the casing.
Replacing a Fluorescent Bulb

Remove the fixture’s diffuser. The diffuser is the plastic cover that fits over the housing. For non-recessed fluorescent lights, lift and pull the edge of the diffuser off of a lip on the fixture's housing. If your fixture is recessed, use a screwdriver to pry down strips of metal that frame the diffuser. If you’re not sure how to remove the diffuser, carefully push and pull one end of the diffuser, and try to feel if it catches a lip to stay in place. Push it upward toward the ceiling, then gently pull the edge of the diffuser outward so you can slide it over the lip. Note the steps you take to remove the diffuser so you’ll have an easier time reinstalling it. Remember to stand on a sturdy ladder or step stool instead of a chair. The ladder or step stool should be tall enough so you can comfortably reach the fixture without standing on tiptoes.

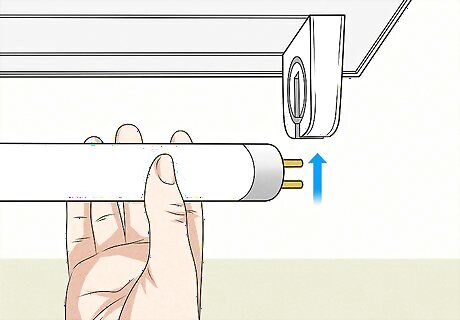
Unplug the bulb by twisting it 90 degrees. Be sure to turn off the light switch before changing the bulb. Hold the long, tubular bulb with both hands, and rotate it 90 degrees, or 1/4 turn, counterclockwise. This will align the prongs with slits in the sockets so you can remove the bulb. Lower one end straight down from the socket, then pull the bulb out of the fixture. Fluorescent bulbs don't create much heat, so it should be cool to the touch. To stay on the safe side, hold the back of your hand near the bulb to check for heat. Since fluorescent bulbs are so long, it’s easy to lose track of an end and accidentally hit something. Pay attention to surrounding objects and handle the bulb carefully. When a fluorescent bulb needs to be replaced, it flickers, or the ends turn gray or black.
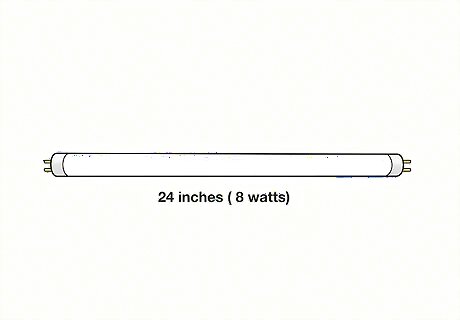
Purchase a matching replacement bulb. Check inside the light fixture for an information label. It should tell you the bulb length and wattage you’ll need. If you don’t have a replacement on hand, head to your local hardware or home improvement store to purchase a new bulb with the same length and wattage. If you don’t see an information sticker, you could always measure the old bulb’s length, or check it for markings that indicate its length and wattage.
Align the new bulb’s prongs with the opening in the socket. Look for the narrow slits in the sockets where the bulb’s prongs fit. Slide the prongs on one end into the slit, then slide the other end’s prongs into place. After sliding both ends into the socket, rotate the entire bulb 1/4 turn clockwise. Check that the light works before replacing the diffuser. If it doesn’t work, turn off the light switch and double check the connection between the prongs and sockets. If it still doesn’t work, you may need to have the sockets replaced.

Replace the fixture’s diffuser. If the fixture isn't recessed, place one long edge of the diffuser over the lip that runs the length of the fixture. Keeping that edge latched over the lip, rotate the diffuser to bring its other long edge toward the fixture. Carefully pull the diffuser’s edge out, then slide it over the lip to secure it to the fixture. For recessed fluorescent fixtures, hold the diffuser in place, then bend the metal frame back over the edges of the diffuser.


Comments
0 comment