
X
Research source
Be sure to check your local regulations before beginning this process.
Picking Ingredients

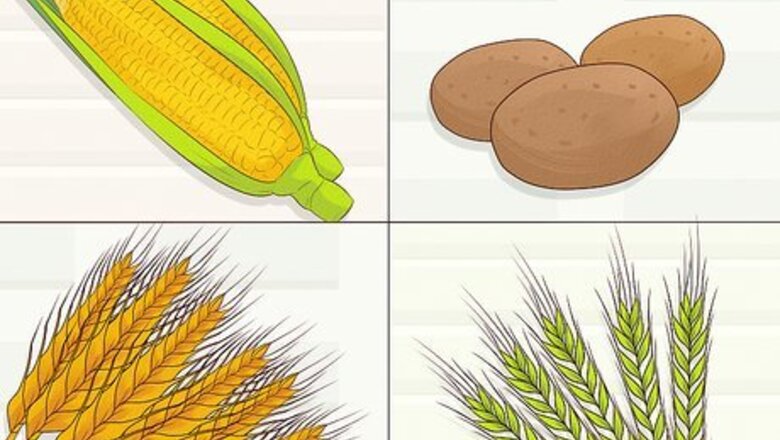
Choose the ingredients you want to ferment into vodka. Vodka is commonly made from wheat, rye, barley, corn, or potatoes. Sugar and molasses can also be used alone or added to other ingredients. One distiller even makes an innovative vodka from Pinot Noir red wine. Whatever you choose, it must have sugars or starches so that alcohol is ultimately produced. Yeast eats sugars or starches and spits out alcohol and carbon dioxide. When making vodka from grains and potatoes, a mash must be made that contains active enzymes that break down the starches from the grains or potatoes and makes fermentable sugars. Fruit juice already contains sugars so starch-degrading enzymes are not needed. As with fruit juice, vodka made from store-bought sugars need only be fermented, thus bypassing the need for a mash. When already fermented mediums such as wine are used, the medium can be distilled right away into vodka.

Decide whether you need additional enzymes. Depending on what you decide to make your vodka out of, you may need to add enzymes to help convert the starches into sugar. If you’re using grains and potatoes, you’ll need additional enzymes. Grains and potatoes are sources of starch, so enzymes are needed to break the starch down into sugar. If you’re using malted whole grains, you do not need additional enzymes. Malted whole grains, like malted barley or malted wheat, are rich in natural enzymes that break down starches into fermentable sugars. If you’re using refined sugar and molasses, you do not need additional enzymes because the sugar is already present.
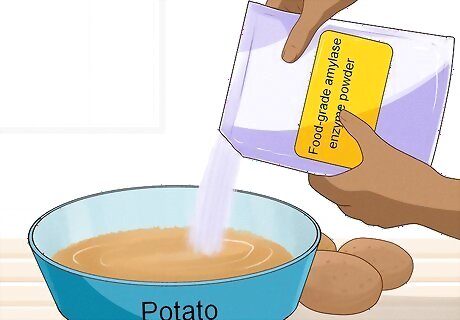
Add additional enzymes, if necessary. Food-grade amylase enzyme powder can be purchased from a homebrew shop and added to the mash to convert the starch into fermentable sugars, if you're using potatoes, for example. Use the recommended amount for the amount of starch to be broken down. There is no need to use malted, enzyme-rich grains such as malted barley or wheat when using enzyme powder. For enzymes to be able to break down starches, the starches must first be gelatinized. Flaked (rolled) grains are often already gelatinized. Un-gelatinized ingredients such as potatoes and unrolled or malted grains are heated in water to the gelatinization temperature of the particular starch that is used. Potatoes usually gelatinize at about 150° F (66° C), and barley and wheat gelatinize at about the same temperature. Theoretically, a potato mash should only need to be heated to 150° F (66° C). If a low temperature is used with potatoes, the potatoes should be finely shredded before adding them to the water. Starch-degrading enzymes only work at specific temperatures and are destroyed at high temperatures. A temperature of 150° F (66° C) is common, but temperatures above 158° F (70° C) will result in the destruction of the enzymes. The absolute maximum temperature is 165° F (74° C).
Making Different Mashes
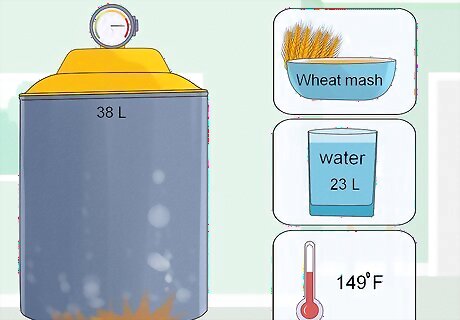
Try a wheat mash. In a 10 gallon (37.9 L) (38 L) metal pot with lid, heat 6 gallons (23 L) of water to about 165° F (74° C). Add 2 gallons (7.6 L) of dry, flaked wheat and stir. Check the temperature and ensure that it is between 150° F (66° C) and 155° F (68° C). Stir in 1 gallon (3.8 L) of crushed wheat malt. The temperature should be about 149° F (65°). Cover and let rest for 90 minutes to 2 hours, stirring occasionally. The starches should convert into fermentable sugars during this time, and the mixture should become much less viscous. After 90 minutes to 2 hours, cool the mixture to 80° to 85° F (27° to 29° C). Use an immersion chiller for rapid cooling or just let it cool overnight, but don’t let it get much below 80° F (27° C).
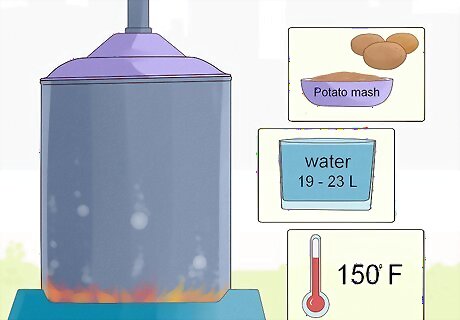
Go for a potato mash. Clean 20 pounds (9.1 kg) of potatoes. Without peeling, boil them in a large kettle until gelatinized, about one hour. Discard the water and thoroughly mash the potatoes by hand or with a food processor. Return the mashed potatoes to the kettle and add 5 to 6 gallons (19 to 23 L) of tap water. Mix to blend and bring mixture to just over 150° F (66° C). Add 2 pounds (0.91 kg) of crushed, malted barley or wheat and stir well. Cover and stir periodically over the course of 2 hours. Let it cool overnight to 80° to 85° F (27° to 29° C). Letting it cool for a long period of time also gives the barley malt enzymes more time to break down the potato starch.

Make a corn mash. Make a mash according to the wheat mash recipe, but substitute flaked, pre-gelatinized corn (maize) for the flaked wheat. Alternatively, sprout your own corn over the course of 3 days and make a mash from it without added malted grain. A root about 2 inches (5.1 cm) long should sprout from each grain. The sprouted corn will contain enzymes that were formed during the germination (sprouting) process.
Fermenting the Alcohol
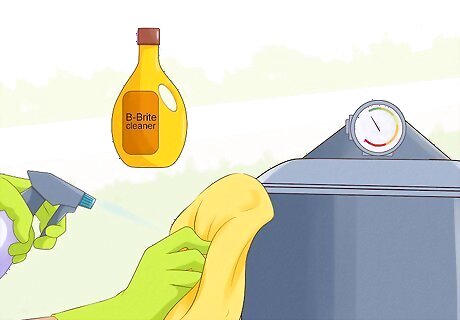
Clean all your utensils and prepare the area properly. Fermentation is conducted in clean, sanitized vessels that are sometimes open but often sealed from the air to prevent cross-contamination. Fermentation usually lasts for 3-5 days. Fermentation is also possible in vessels that haven't been cleaned or sanitized, and the distilled product will yield drinkable alcohol, but the fermentation may result in a high level of unwanted flavor compounds and higher alcohols due to the action of unwanted yeast stains and bacteria. Oxidative cleaners such as B-Brite are available at homebrew shops, as are sanitizers such as iodophor.
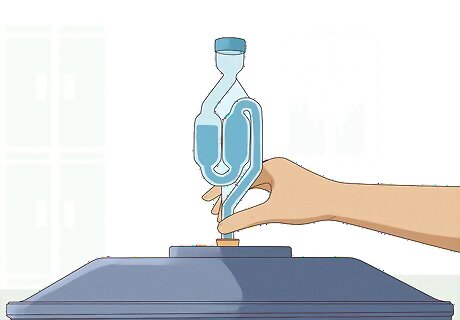
Choose and set up your airlock. An airlock is a mechanism that will allow CO2 to escape without letting O2 to get in. Five-gallon (19-L) batches of strained mash can be fermented in a 7.5-gallon (28-L) food-grade bucket or in 6-gallon (23-L) carboys. Lids can be affixed to buckets, as can drilled rubber stoppers to carboys, but when using a lid or a stopper, never seal the vessel completely, as pressure from carbon dioxide production will create explosive pressure. Always affix an airlock to lids and drilled rubber stoppers to prevent explosive pressure from building. When fermentation is conducted in open vessels, put a cheesecloth over the vessel to keep out bugs and other undesirable things.
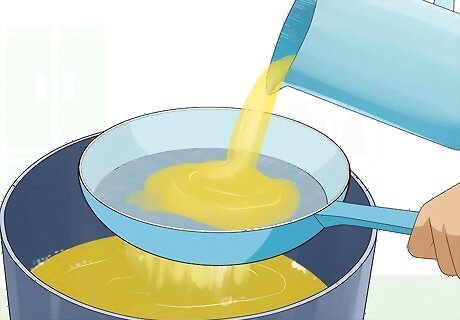
Strain the mash or liquid into your fermentation vessel. If a mash was made, strain the liquid with a fine mesh strainer from the mash into your cleaned and sanitized fermentation vessel. Try to splash the liquid and pour it from a distance so that it is well aerated. Yeast needs air (oxygen) initially to grow and start a quality fermentation. This is because yeast makes cellular material in the form of lipids from oxygen. However, oxygen is not desired after this initial growth stage, as yeast produces alcohol in the absence of oxygen. You may want to add a sugar solution at this time. Aerate the sugar solution by pouring it from a distance into the fermentation vessel. If juice is to be fermented, aerate by pouring from a height through a sieve or strainer into the fermentation vessel.
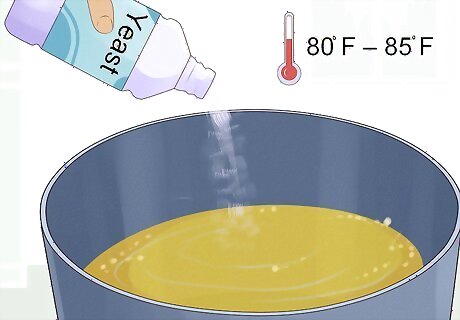
Add yeast to the fermentable medium. Hydrate the appropriate amount of dried distillers or other desired yeast and add it to the liquid. Stir with a clean, sanitized spoon to evenly disperse the yeast. If using an airlock, the airlock will bubble during active fermentation, and the bubbling will slow dramatically or cease altogether as the liquid becomes completely fermented. Keep the fermenting liquid in a room that is about 80° to 85° F (27° to 29° C) to facilitate good, efficient fermentation. Alternately, use a heating belt in cold areas. Distillers yeast will ferment cleanly, produce a high amount of alcohol (ethanol), and produce a relatively low amount of unwanted compounds such as alcohols other than ethanol. The amount of yeast used will depend on the specific brand or type of yeast used. Nutrients may be included with the yeast in the yeast packet. Yeast nutrients are needed when fermenting a medium that is low in nutrients, such as sugar solutions, but they can also improve fermentations when used with nutrient-rich mediums such as those made from grains.
Collect the wash. Siphon off the fermented, alcoholic liquid (called the wash) into a cleaned and sanitized vessel or into the distillation apparatus. Leave the yeast sediment behind in the fermentation vessel, as it can scorch when heated in the still. The siphoned wash may also be further clarified by filtration or other means before distillation.
Picking a Still
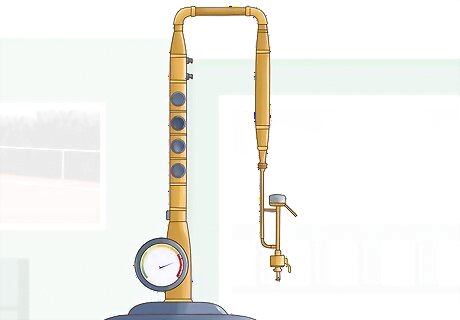
Use a column still if possible. Column stills are more complex and sophisticated than pot stills. They can be purchased or, depending on the still design, built using readily available materials. However, column stills and pot stills work in a relatively similar manner. Cooling water is usually circulated through a sealed compartment in the distillation column, causing the vaporized alcohol and other substances to condense in the column. This means that such a still must be attached directly to a faucet or a mechanical pump to move water from a supply into the still. If not recirculating water from a single supply, thousands of gallons of water may need to be used to make a small batch of vodka. If water is recirculated from a central reservoir using a pump, about 50 gallons (189 L) of water can be used, but the water will heat up and become less effective.
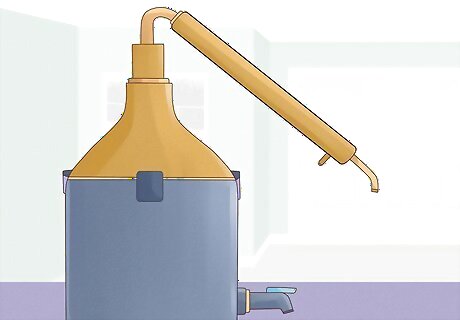
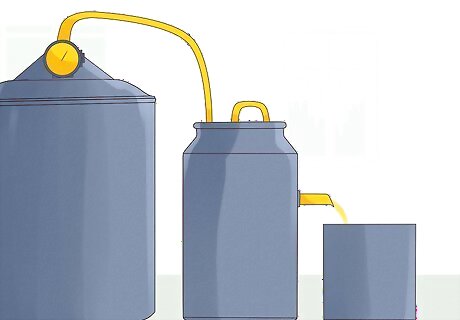
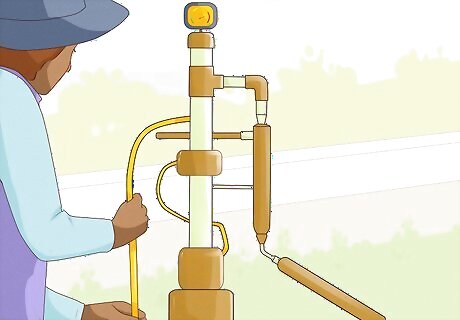
Opt for a pot still if you can’t find a column still. Simple pot stills are akin to pressure cookers that are attached to piping or tubing. They can be constructed very easily and cheaply. Unlike column stills that are essentially vertical columns, pot stills may utilize bent or coiled tubing or piping that can be submersed in a vessel of cooling water. Pumps and large volumes of cooling water are not required, but can be used.
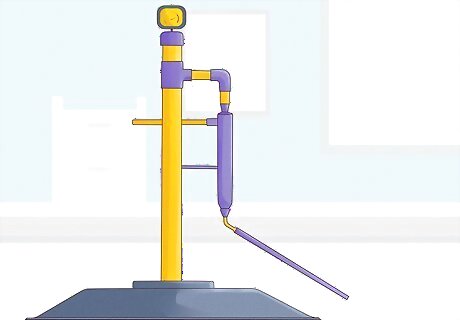
Use a reflux still, if necessary. A reflux still can do multiple distillations at one time. The packing between the condenser and the pot allows vapor to condense and trickle back down to the liquid pool. This “reflux” cleans the rising vapor and increases the purity of the vodka.
Distilling the Alcohol
Get ready for distillation. Stills heat the fermented, relatively-low alcoholic wash to a temperature that is greater than the boiling point of alcohol, yet less than the boiling point of water. In this way, the alcohol vaporizes while the bulk of the water does not. The vaporized alcohol (along with some vaporized water) travel up into the column, pipe or tube of the still. External cooling in the form of cold water is applied to the column, pipe, or tubing, causing the vaporized alcohol to cool and condense back into liquid. This alcoholic liquid is collected and becomes vodka.
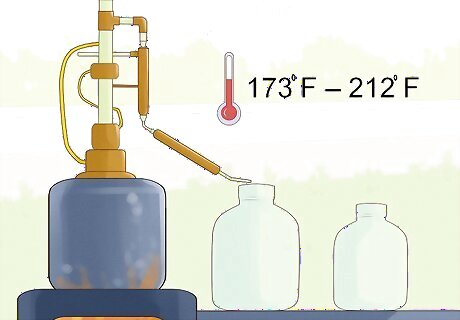
Heat the wash in the still to begin the distillation process. Depending on the type of still being used, gas burners, wood fires, or electric hot plates are all options. A temperature of about 173° F (78.3° C) at sea level is desirable, but the temperature must be kept below the boiling point of water, 212° F (100° C) at sea level. As the wash becomes heated, alcohol and other substances vaporize and condense in the water-cooled area of the still.
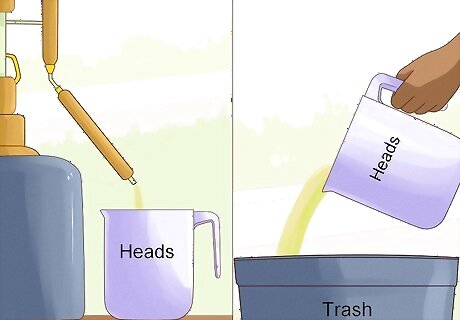
Throw out the heads. The first distilled liquid (called the “heads”) that is recovered from the still will be full of harmful methanol and other volatile chemicals that are toxic and can be fatal. For 5 gallons (19 L) of wash, discard at least the first 2 ounces (60 mL) of distillate. It is extremely important that you do not drink this distilled liquid! Learn proper distilling techniques for safety. "As a longtime homebrewer, I was so eager to start distilling spirits. But I wasn't aware how important it is to toss out the methanol "heads." This guide really stressed that it's super toxic and could make people sick if you drink it. It laid out when to keep the good "hearts" versus the "tails," too. Now, I can feel good about distilling vodka safely at home without worrying I'll hurt myself or others." - Miguel U. Get specific how-to's for novice distillers. "I was intrigued by the idea of distilling vodka but had zero experience actually doing it. The step-by-step instructions here on preparing different mashes, setting up fermentation vessels properly, operating various still types, and diluting the final product gave me the confidence and knowledge I needed as a total beginner. I especially appreciated the tips on cleaning equipment to prevent off flavors." - David M. Learn the versatility of ingredients. "I had assumed vodka was made from boring old potatoes, but this article opened my eyes to the wide range of sugars and starches you can use as the base, from molasses to wine to sprouted corn. As someone who loves infusing flavors, I'm excited to experiment with mashes made from diverse ingredients to create unique vodka flavors. The details on managing fermentation temperatures and enzymes for each mash type are invaluable." - Ian T. Get guidance tailored for home distilling laws. "As a home distilling enthusiast, I used to just dive in without considering regulations. This guide gave me an important reality check. Now I know production is illegal in many places, including my own country, and educated myself on requirements like registering my still in others. It convinced me to pursue this hobby safely and legally by first petitioning lawmakers to update outdated distilling laws." - Thaddeus G. Have a story our readers should hear? Share it with 1 billion+ annual wikiHow users. Tell us your story here.
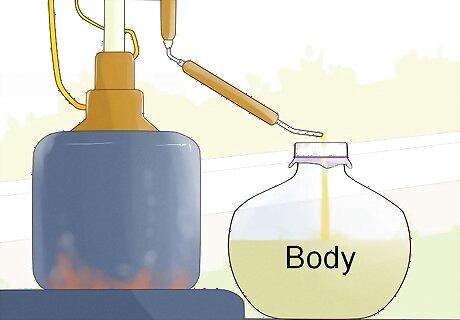
Collect the body. After you discard the heads, the collected distillate will contain the desired alcohol (ethanol), along with some water and other compounds. This is called the “body” or the “heart.” During this time, if using a column still with flowing cold water, the water flow can be adjusted to control the distillate output and purity. Aim for 2 to 3 teaspoons (9.8 to 14.8 mL) of distillate per minute. Increased distillate output results in decreased purity.
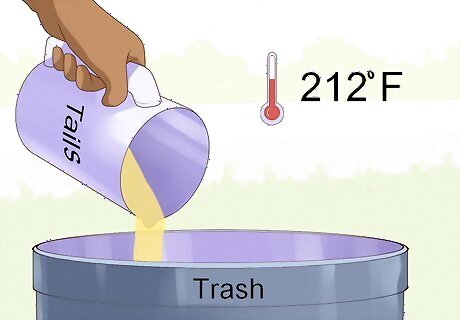
Throw out the tails. Towards the end of the distillation process, when the temperature creeps up to 212° F (100° C) and beyond, the distillation process produces other nasty chemicals. These are called the “tails,” which contain fusel alcohols. The tails are undesirable as they contain propanol and butanol and should be discarded. Always make sure to throw out the tails, as they should not be consumed!

Check the alcohol content and purity of the distillate. Cool a sample of the distillate to 68° F (20° C) and use an alcometer to measure the percentage of alcohol of the distillate. The distillate may be too diluted to serve as acceptable vodka (weaker than 40% alcohol), or may be more concentrated than desired (perhaps higher than 50% alcohol). Vodka is usually diluted before bottling, so the distillate may have a very high alcohol content. The distillate may also be too flavorful and aromatic and require additional distillations or carbon filtering.

Redistill the liquid, if necessary or desired. This increases the alcohol content and further purifies the distillate. It is common to redistill the distillate 3 or more times to achieve vodka that has a high purity. Keep in mind that the heads and tails need to be discarded each time you distill the vodka! Premium brands of vodka go through 4 or 5 distillates, and most other brands go through 3 before the vodka is diluted and bottled.
Adding the Finishing Touches

Filter the vodka through carbon. Pass the distillate through an activated carbon filter, such as those available at homebrewing shops, to remove unwanted volatile flavors and aromas. Carbon water filters can also be modified to purify the distillate.

Dilute the vodka to the desired strength. Add purified water to the distillate to attain the desired alcohol percentage. Use an alcometer to measure the alcohol percentage several times throughout this process until you achieve the desired strength.
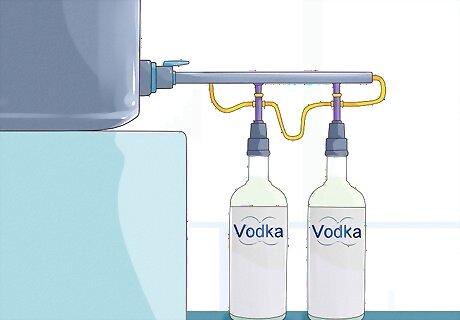
Bottle the vodka. Fill bottles using a gravity bottle filler setup and cork or cap the bottles. Label the bottles with custom labels if desired. Some gravity fillers may consist of a 7.5 gallon (29 L) bottling bucket (with spigot), vinyl tubing, and a simple spring-loaded plastic bottle filler. Multiple-spout wine bottle fillers can also be used.


Comments
0 comment