
Preparing for a Subcutaneous Injection

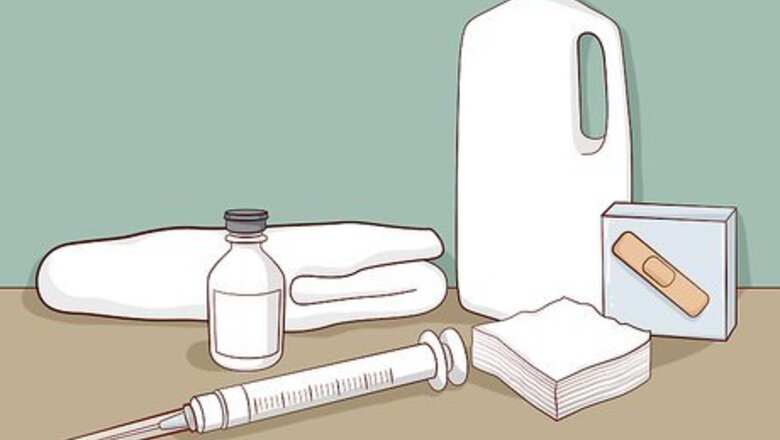
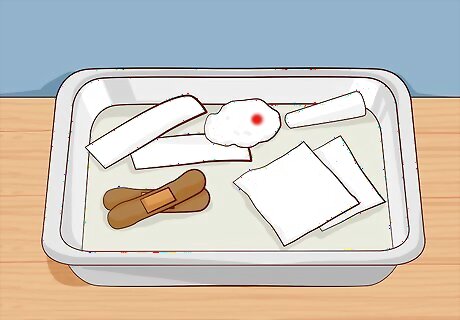
Gather your supplies. Performing a subcutaneous injection properly requires more than just a needle, syringe, and medicine. Before proceeding, make sure you have the following: A sterile dose of your medication (usually in a small, labeled vial). A suitable syringe with a sterile needle tip. Depending on the size of your patient and the amount of medication to be administered, you may choose to use one of the following configurations or another safe, sterile means of injection: A 0.5 or 1 cc syringe with a 27-gauge needle A pre-filled, disposable syringe A container for safely disposing of your syringe, such as an empty plastic milk container. Tape over the lid to secure it after putting a syringe inside and then dispose of the container. A sterile gauze pad (usually 2 x 2 inches) A sterile adhesive bandage (note - make sure the patient is not allergic to the adhesive, as can lead to irritation near the wound) A clean towel
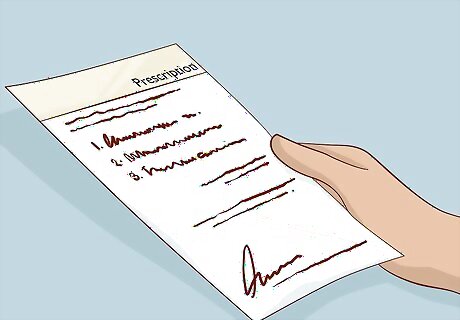
Ensure you have the correct medication, dosage, patient, route, and date. Most subcutaneously-injected medications are clear and come in similarly-sized containers. Thus, it's easy to get them mixed up. Double-check the medication's label to ensure you have the right medication and dosage before proceeding. Then, check the patent’s name, the route of injection, and the date before administering. Note - some medication vials contain only a single dose, while some contain enough medication for multiple doses. Ensure you have enough medication to administer the recommended dose before continuing. Heparin subcutaneous injections often come in pre-filled syringes, so it will be easier to administer the medication.

Prepare a clean, ordered work area. When performing a subcutaneous injection, the less you have to come in contact with un-sterilized materials, the better. Having all your tools laid out ahead of time in a clean, easily-accessible work area makes the process of injection quicker, easier, and more sanitary. Lay your towel on a clean surface within easy reach of your intended work site. Lay your tools on the towel. Arrange your supplies on the towel in the order you will need them. Note: You can make a small tear on the edge of your alcohol wipe packages (one that doesn't puncture the inner pocket containing the alcohol wipe) to make them easier to quickly open when you need them.

Choose an injection site. Subcutaneous injections are meant to be given into the layer of fat below the skin. Certain areas of the body allow this fatty layer to be accessed more easily than others. Your medication may come with instructions about which specific injection site to use - check with your local health care professional or the medication's manufacturer if you are uncertain of where to administer your medication. Below is a common list of sites for subcutaneous injections: The fatty part of the tricep on the side and back of the arm between the elbow and shoulder. The fatty part of the leg on the outside front portion of the thigh between the hips/groin and knee. The fatty part of the frontal abdomen below the ribs, above the hips, and not directly adjacent to the belly button. Use 3 fingers placed under the belly button to find the location. Note: It's important to rotate injection sites, as repeated injections into the same location can cause scarring and hardening of the fatty tissue, making future injections more difficult and interfering with absorption of the medication.
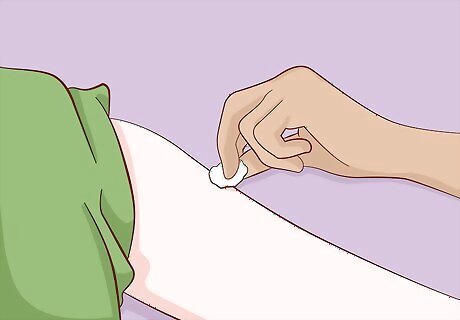
Wipe the injection site. Using a fresh, sterile alcohol wipe, clean the injection site by gently wiping in a spiral motion from the center outward, being careful not to go back over already clean areas. Allow the site to air dry. Before wiping, if necessary, expose the area of the body where the injection will be given by moving any clothing, jewelry, etc. away. This will not only make it easier to give the injection without obstruction, but also reduce the risk of infection from un-sterilized clothing coming into contact with the injection wound before it's bandaged. If, at this point, you discover the skin at the injection site you've chosen is irritated, bruised, discolored, or distressed in any other way, pick a different site.

Wash your hands with soap and water. Because subcutaneous injections pierce the skin, it's important for the person administering the injection to wash his or her hands. Washing kills any bacteria present on the hands, which, if accidentally transferred to the small wound caused by the injection, can cause infection. After washing, dry thoroughly. Be sure to wash methodically, ensuring all the surfaces of your hands receive soap and water. Studies have shown that the vast majority of adults don't wash their hands well enough to kill all of the bacteria. Wear a clean pair of gloves if possible.
Drawing a Dose of Medication

Remove the tamper resistance tab from the vial of medication. Set this on the towel. If this tab has already been removed, as in the case of multidose vials, wipe the vial's rubber diaphragm with a clean alcohol wipe. Note - if you are using a pre-filled syringe, skip this step.
Grab your syringe. Hold the syringe firmly in your dominant hand. Hold it like a pencil, with its (still capped) needle pointed up. Though, at this point, you shouldn't have removed the syringe's cap, handle it carefully regardless.
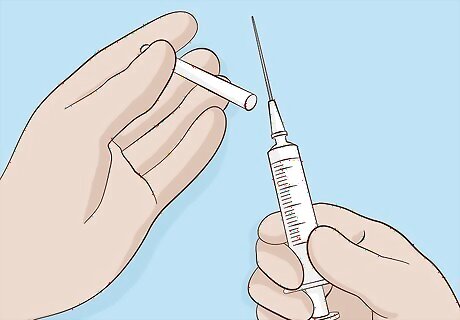
Remove the needle's cap. Grasp the cap over the needle with the thumb and forefinger of your other hand and pull the cap off the needle. Take care, from this point forward, not to allow the needle to touch anything except your patient's skin when s/he receives the injection. Lay the discarded cap on your towel. You are now holding a small but extremely sharp needle - handle it with caution, never carelessly gesturing or making sudden movements with it. Note - if you are using a pre-filled syringe, skip to the next section.

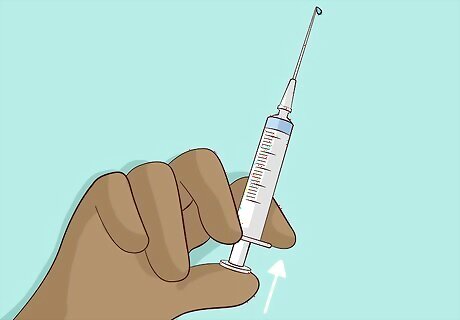
Pull the plunger back on the syringe. Keeping the needle pointed up and away from you, use your non-dominant hand to pull the syringe's plunger, filling the syringe with air to the desired dosage. This will be very slight and you should not be able to see
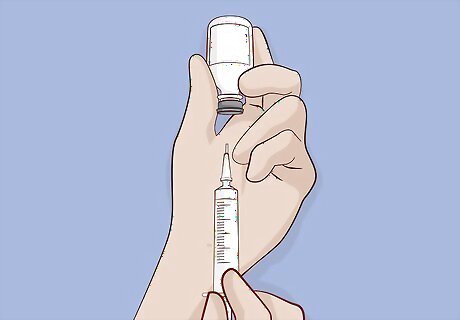
Grab the medication vial. Carefully use your non-dominant hand to grab the vial of medication. Hold it upside down. Take extra care not to touch the vial's rubber diaphragm, which must stay sterile.
Insert the needle into the rubber stopper. At this point, your syringe should still contain air.

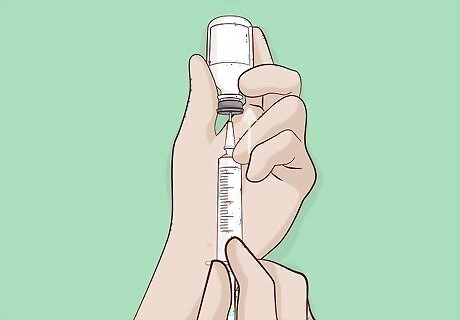
Depress the plunger injecting the air into the medication vial. The air should rise through the liquid medicine to the highest point of the vial. This serves two purposes - first, it empties your syringe, ensuring that no air bubbles will be administered along with the medicine. Second, it makes it easier to draw the medication into the syringe by increasing the air pressure in the vial. This may not be necessary depending on the thickness of the medication.
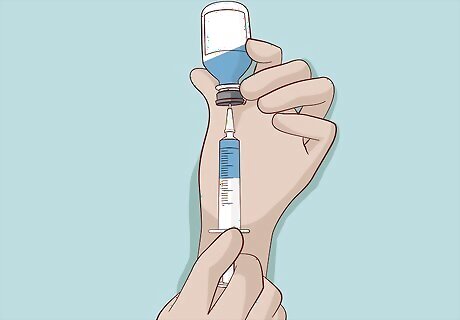
Draw the medication into your syringe. Making sure the needle tip is submerged in the liquid medicine and not the air pocket within the vial, pull back on the plunger slowly and gently until you have reached your desired dosage. You may need to tap the sides of your syringe to force air bubbles to the top, then expel the air bubbles by gently pressing the plunger, forcing the air bubbles back into the medication vial.
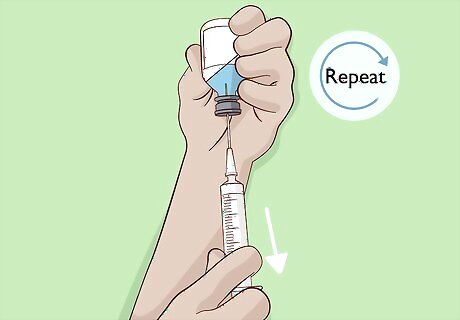
Repeat the previous step as needed. Repeat the process of drawing medication into your syringe and expelling air bubbles until you have the desired dose in your syringe with no air bubbles.

Remove the vial from your syringe. Place the vial back on your towel. Do not set your syringe down at this point, as doing so can contaminate your needle which can lead to infection. You may also need to change the needle at this point. Pushing the needle through the opening on a vial dulls the needle, so putting a new needle on the vial will make for an easier injection.
Giving a Subcutaneous Injection
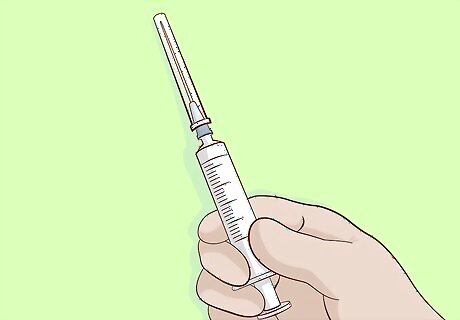
Ready the syringe in your dominant hand. Hold the syringe in your hand as though you are holding a pencil or a dart. Make sure you can easily reach the syringe's plunger.
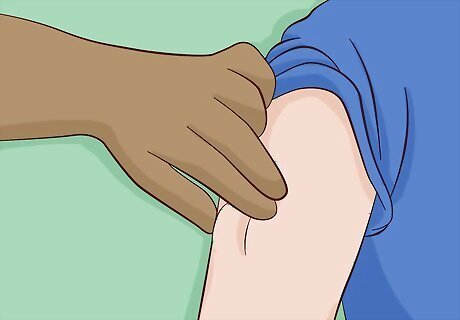
"Pinch" or gather the skin at the injection site gently. Using your non-dominant hand, gather about 1 ⁄2 to 2 inches (3.8 to 5.1 cm) of skin between your thumb and index finger creating a slight mound of skin, taking care not to bruise or damage the surrounding area. By bunching up the skin, you create a thicker area of fat for you to inject into, ensuring the entire dose is administered into the fat and not into the underlying muscle. When gathering your skin, do not gather any muscle tissue. You should be able to feel the difference between the soft upper fat layer and firmer, lower muscle tissue. Subcutaneous medications are not intended for injection into the muscle and, if administered into muscle, may result in bleeding into the muscle tissue. This is especially true if the medication has blood-thinning properties. However, the needles used for a subcutaneous injection are usually too small to hit the muscle, so this should not be a problem.
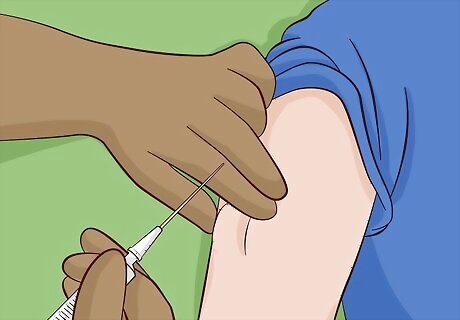
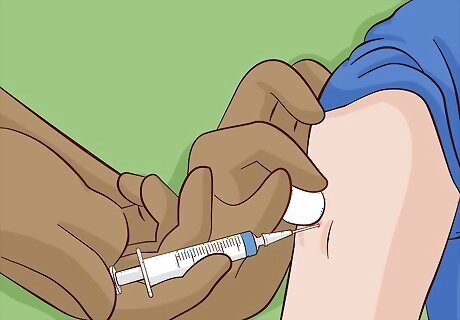
Insert the syringe into the skin. With a slight snapping motion of your wrist, plunge the needle all the way into the skin. Usually, the needle should be inserted into the skin at 90 degrees (straight up and down, relative to the skin) to ensure that the medication is injected into the fatty tissue. However, for exceptionally thin or muscular people with little subcutaneous fat, you may need to insert the needle at a 45-degree angle (diagonally) to avoid injecting it into muscle tissue. Make sure to gather the skin and hold it gently while giving the injection. Act quickly and firmly, but without jamming or stabbing the needle into the patient with excessive force.

Depress the plunger with steady, even pressure. Push down on the plunger until all of the medication has been injected. Use one controlled, steady motion.
Press a piece of gauze or a cotton ball next to the needle at the injection site. This sterile material will soak up any bleeding that occurs after the needle is removed. The pressure you apply to the skin through the gauze or cotton will also prevent the needle from pulling on the skin as it's removed, which can be painful. However, it is also okay to apply the gauze or cotton after removing the needle.
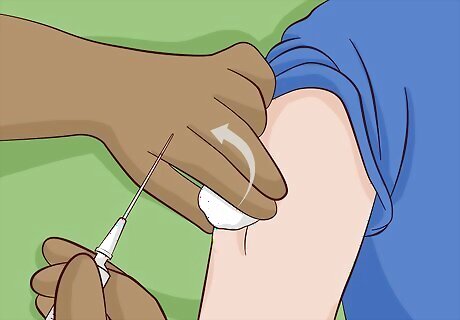
Remove the needle from the skin in one smooth motion. Either gently hold the gauze or cotton ball in place over the wound or instruct the patient to do so. Do not rub or massage the injection site, as can cause bruising or bleeding under the skin.
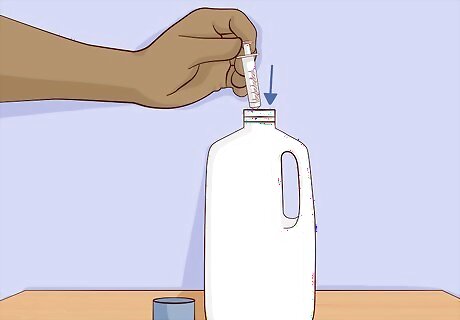
Dispose of your needle and syringe. Carefully place your needle and syringe in a proper puncture-resistant sharps container. It's very important to ensure the needles aren't thrown out with the "normal" trash, as used needles can spread potentially deadly blood-borne illnesses.

Secure the gauze to the injection site. After disposing of the needle, you may secure the gauze or cotton to the patient's wound with a small adhesive bandage. However, because bleeding is likely to be minimal, you may also allow the patient to simply hold the gauze or cotton in place for a minute or two until bleeding stops. If using a bandage, make sure the patient isn't allergic to the adhesive.
Put all of your supplies away. You have successfully completed your subcutaneous injection.


Comments
0 comment