

Readying Your Mower and Your Lawn
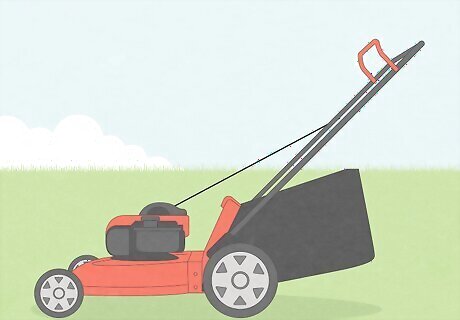
Use the right mower for your lawn. Gas-powered push mowers tend to be the most common choice for the typical suburban home lawn, but you actually have several options: Manual reel mowers are powered only by you pushing them, and are an affordable and environmentally-friendly choice for very small, flat lawns. Electric push mowers are quieter and cost less to operate than gas models, but they're also heavier and more expensive. Corded models in particular are best suited to small lawns (0.25 acres or less). Gas walk-behind mowers come in both push-propelled and self-propelled varieties. Either is suitable for lawns up to about 0.5 acres in size. Riding mowers cost more than walk-behind models, but will save you time with most lawns over 0.5 acres in size. They aren't safe for use on steep hillsides, though.
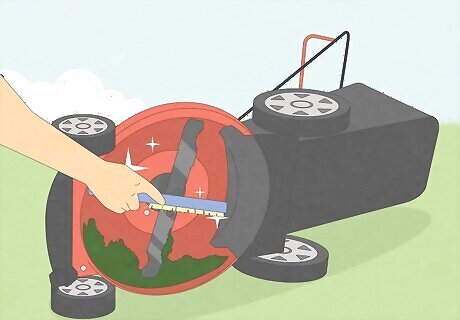
Keep your mower blades sharp and clear of debris. Dull mower blades cause jagged cuts in your grass blades, which create brown tips and invite grass diseases. If your lawn looks ragged after a mow, it’s probably time for a blade sharpening. You can expect to need to sharpen them 1-2 times per year. You can remove and sharpen the blades yourself with a few tools and some mechanical know-how, or you can search for "lawn mower sharpening near me" to find local pros. Even if your blades don’t seem to need sharpening, inspect them for damage every 3-4 mows, and brush or rinse away any built-up grass debris on the blades and underside of the mower.
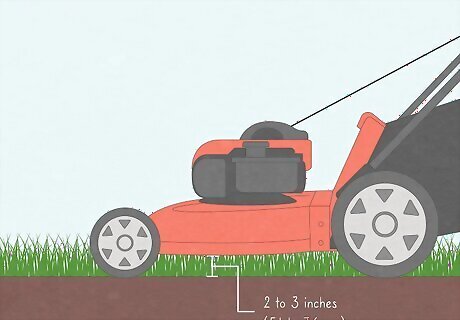
Set your mowing height based on your grass type(s) and climate. Many people mow their lawns too short in an effort to reduce how often they need to mow. This, however, leads to brown lawns and more weeds. Ideal mowing heights vary based on several factors, but usually fall within the range of 2 to 3 inches (5.1 to 7.6 cm). Measure from the ground to the bottom of your mower’s mowing deck, then from this point up to your blades. This total equals the mowing height. Look for mowing guides specific to your lawn type, such as https://www.lowes.com/n/how-to/mow-your-lawn-correctly. You can also contact your local agricultural extension program for advice.
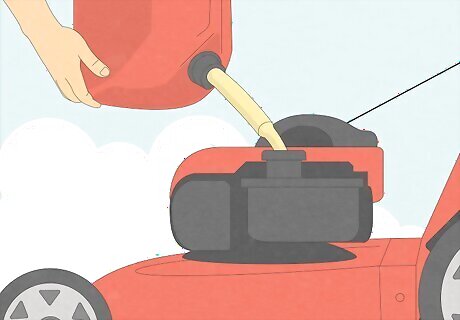
Check the fuel and oil levels before starting the mower. It is unsafe to add fuel to a warm mower engine, so give the fuel tank a fill-up before you start mowing. Check the oil level every 2-3 mows as well, and add oil as needed before firing up the engine. You’ll also need to occasionally change the oil and clear the fuel lines, or have a pro do this routine maintenance for you. Consider giving your mower a tune-up once a year at the beginning of spring.
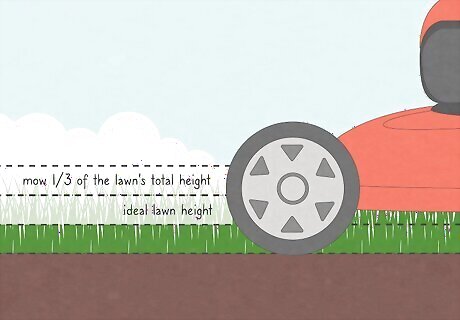
Mow your lawn on its schedule, not yours. Some people mow their lawn like clockwork every Saturday afternoon, but it’s better to mow based on the height of the grass. Use the “1/3s rule” and don’t mow down more than a third of the total height of your grass each mowing. So, if you keep your lawn at 2 inches (5.1 cm) high, wait until the grass is 3 inches (7.6 cm) high before mowing it. Check the weather forecast for dry weather as well. Wet grass can clog your mower, make compaction in your yard, and make it too slippery to mow safely. It’s better to mow in the evening after a dry day. This reduces clumping, lawn damage, and heat stress on the grass (and you). So plan accordingly.
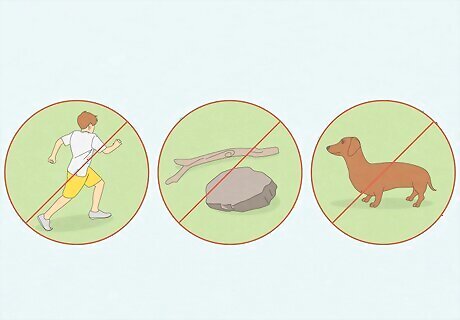
Clear away lawn debris, pets, and kids before mowing. Walk around your lawn and pick up any branches, rocks, toys, pet waste, or other obstructions that could damage your mower or make a mess. Even more importantly, send your pets and kids inside, or at least to a secure area away from where you’ll be mowing. Some mowers can eject rocks or other flying debris at dangerous speeds, so it’s always best to keep other people and pets out of the area.
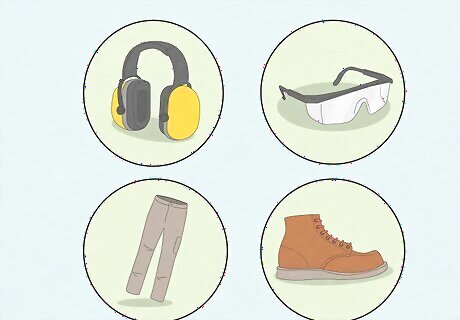
Put on protective eyewear, ear wear, and clothing. Wear safety glasses to protect yourself from flying debris, and ear protection to muffle the loud mower engine. Also put on closed-toe, sturdy footwear and long pants to protect your feet and legs. Put on sunscreen and wear a hat, even on cloudy days or if it's early or late in the day. Be sure to stay hydrated. Take breaks if you're mowing a large lawn, feel overheated, or start to feel tired.
Cutting Your Grass Efficiently
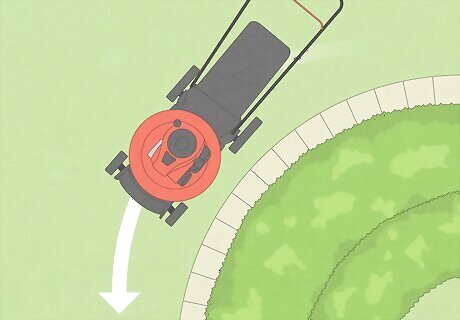
Mow around the perimeter and any obstacles first. Unless you already have a square or rectangular lawn, your initial goal should be to create a squared-off mowing area. Go around trees or along curved planting beds, then create straight lines and angles in those areas. Turn your remaining lawn into one or several rectangles for easier mowing. Mowing around the perimeter first helps you square off the lawn and gives you room to turn as you mow back and forth in rows. You may want to go around the perimeter twice in order to create an even wider turning area.
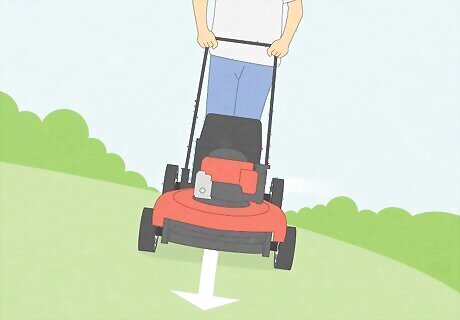
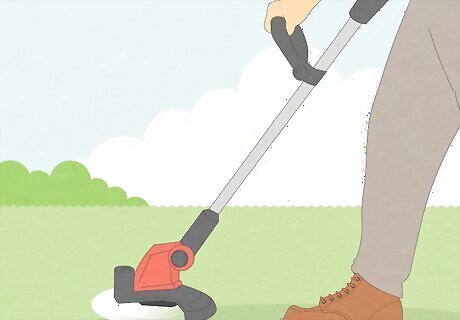
Mow side-to-side on sloped ground. Take any sloped ground into account when creating your rectangular mowing areas. You should never mow up and down a slope that’s anything more than gentle. Instead, go in straight lines that are perpendicular to the slope. If you’d have trouble walking up or down the slope on wet grass, then don't mow up or down it even if the grass is dry. Manual push-reel mowers are less dangerous than larger and heavier powered models on slopes, but you could still be injured by one if you slip and fall. Instead of mowing a slope, try using a string trimmer, or consider planting or placing something other than grass in that area.
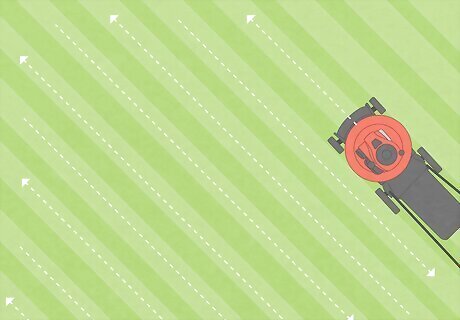
Mow back and forth in straight lines with a slight overlap. In each rectangular area that you’ve created, start along one side and go in a straight line from end to end. Then turn your mower and mow an adjacent row in the opposite direction. Continue this process until you’ve mowed the entire section. The amount of overlap needed will depend on your mower’s setup. Generally speaking, though, you want to place your wheels (on one side) just over the cut line you created with the previous row. Turning to go back and forth will be easier with a zero-turn-radius mower. Otherwise, pivot on the rear wheel closest to the next row and readjust as needed to get into position.
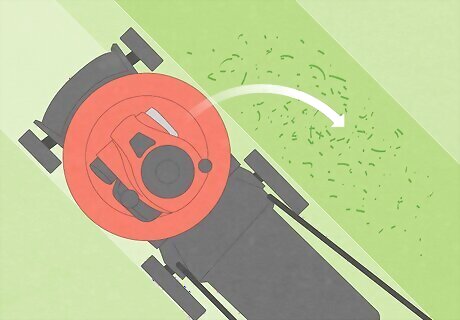
Throw any clippings into the previously-cut row. Finely-cut clippings help to nourish your grass, so leave them scattered thinly throughout your lawn when possible. If you have a side-throwing mower, send the clippings onto the row you just cut. A mulching mower will chop up the grass blades and scatter them for you. Don’t leave clumps of cut grass sitting on your lawn, though — this is more likely to happen if you have a dull blade or if the grass is damp. Either bag your clippings or use a rake to spread the clumps out. If you want to reduce your lawn's thatch, you can use a bag that attaches to your lawnmower to catch the grass clippings. You can add the clippings to your compost pile, use them as mulch, or dispose of them in a curbside trash or composting system.
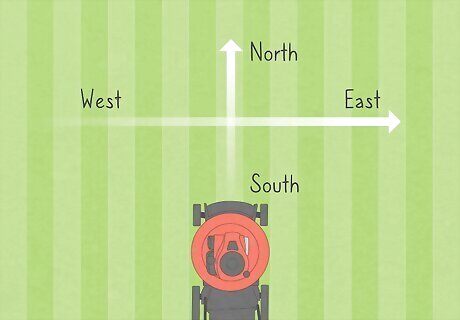
Change the direction of your mowing rows regularly. You shouldn’t, for instance, mow your square lawn in the same north-south lines every time. If you do, the grass will start to bend over permanently in its row’s direction, and you’ll wear track marks from your mower’s wheels into the grass. Instead, consider alternating from north-south to east-west lines with each subsequent mowing session.
Use your string trimmer and/or edger after you finish mowing. String trimmers or edgers aren’t as fast or efficient as mowers, so rely on your mower to cover as much of the lawn as possible. Then use the other tool(s) to get at the remaining grass that the mower couldn’t reach. However, some people do prefer to trim/edge first, so that the abundant clippings created by doing so can be chopped up and spread out by the mower. This is a viable option, but you’ll spend more time trimming and/or edging than necessary, and these methods tend to be harsher on your grass than mowing — e.g., it’s easier to cut the grass far too short in spots.
Creating Lawn Stripes
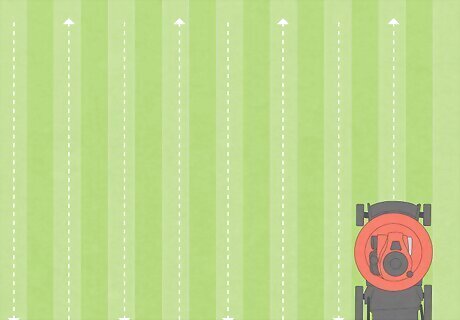
Do simple back and forth rows to create basic lawn stripes. The lighter and darker stripes you see on manicured lawns or professional sports fields are created simply by bending the grass in the direction you’re mowing it. Grass that bends away from where you’re standing looks lighter in color, while grass that bends towards you appears darker. Therefore, a traditional back and forth mowing method will create straight lines that alternate between lighter and darker shades (depending on your viewing angle). To enhance the striping effect by bending the grass more fully, buy a lawn roller and use it to repeat the pattern you just mowed.
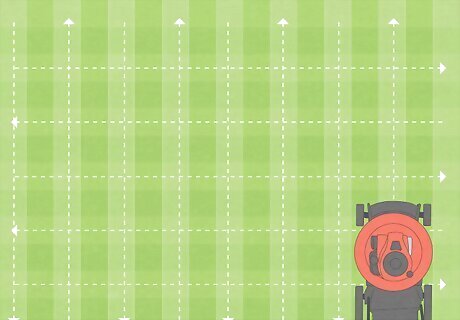
Create checkerboard stripes by mowing in perpendicular rows. To create a checkerboard-style pattern of alternating light and dark squares of grass, you simply need to mow over the same area twice. First, mow in your standard back and forth lines — for instance, north and south. Then, mow over the same area in east and west lines back and forth. When you’re done, you should see the distinctive checkerboard pattern. Finish the job by going around the perimeter one more time at the end, in order to clean up any irregularities caused by your turns.
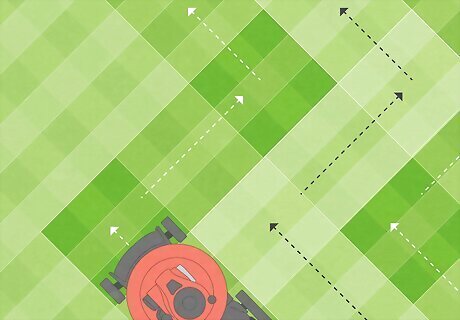
Take it to the next level with diamond or zig-zag patterns. A diamond pattern actually isn’t that much more difficult than the checkerboard. You simply have to rotate your alternating mowing lines 45 degrees, so that you’re mowing essentially from corner to corner within your squared mowing area. For a zig-zag pattern, you have to create a diamond pattern first. You’ll then need to make a repeating series of alternating 90 degree turns each time you mow over 3 diamonds (either light-dark-light or dark-light-dark in shade). This pattern takes some practice, and may be easier if you create a diagram to follow beforehand.


Comments
0 comment